Update: 😁 CloudPanel 2.0 supports ARM. The article is updated accordingly.
Oracle has been offering always-free resources for quite a few years now you can create up to 2 instances in their always-free tier but they also have released an Arm-based instance that allows you to use up to 4 CPUs and 24 GB of RAM. This means you can create either one 4CPU+24 GB RAM instance or a 4x1CPU+6GB RAM instance.
An AMD instance can be installed with a web hosting control panel, such as CyberPanel, Ploi.io, Runcloud, Plesk, etc., without a hitch.
The story is different for ARM 64-bit processor instances, where a limited number of website control panels are available, for example, you can run only AApanel and then configure your websites to run on Nginx, Apache or OpenLiteSpeed. At this time other web hosting control panels don’t support or are not compatible with the ARM64 architecture type.
| Name | Cloudpanel | AApanel |
| Server | NGINX | NGINX/Apache/OLS |
| Database | MYSQL, MariaDB | MYSQL, MariaDB |

Install WordPress or Oracle Ampere with CloudPanel
Step 1. Setup ARM instance
- Create ARM instance on Oracle cloud.
- Select Ubuntu 22.04 as a web server and add an SSH key (use puttygen).
Step 2. Install CloudPanel
- Access your server using the SSH information, remember your login username is ubuntu and you need the SSH key to login.
- Type following to act as root user.
sudo -i
- Type the following command to install Cloudpanel
curl -sSL https://installer.cloudpanel.io/ce/v2/install.sh | sudo DB_ENGINE=MARIADB_10.8 bash
This will install CloudPanel with MariaDB which performs faster than MYSQL.
- Add 8443 port in your Oracle Cloud security settings in order to access the dashboard. A handy video tutorial can be found here.
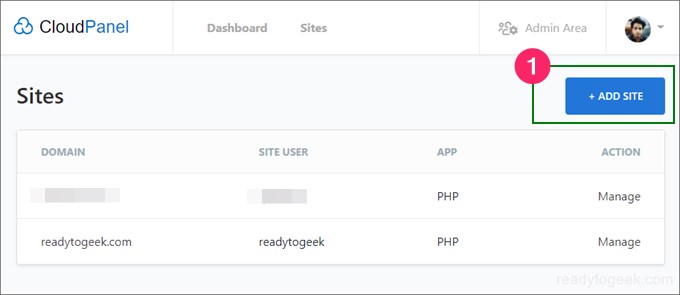
- Access
IP-Address:8443to access your CloudPanel, for the first time it will ask you to set up an account and give a username and a password to access your dashboard. (you need to add port 8443 to your oracle account Step#4). - From CloudPanel Dashboard click on Add site button.
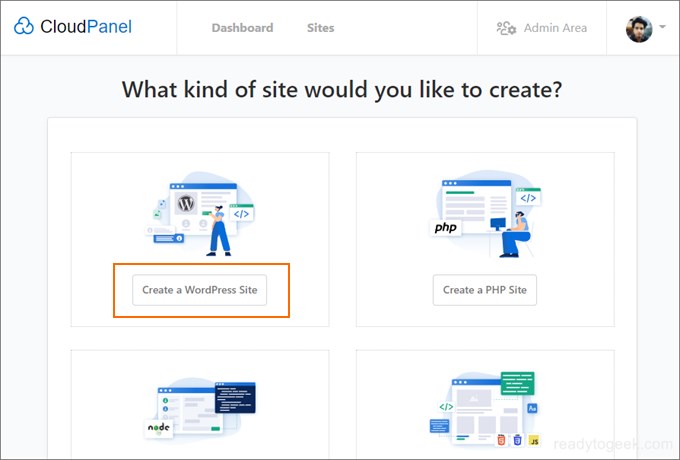
7. Select WordPress by clicking on Create a WordPress Site.
8. Fill up basic details, and luckily the database and user are automatically created.
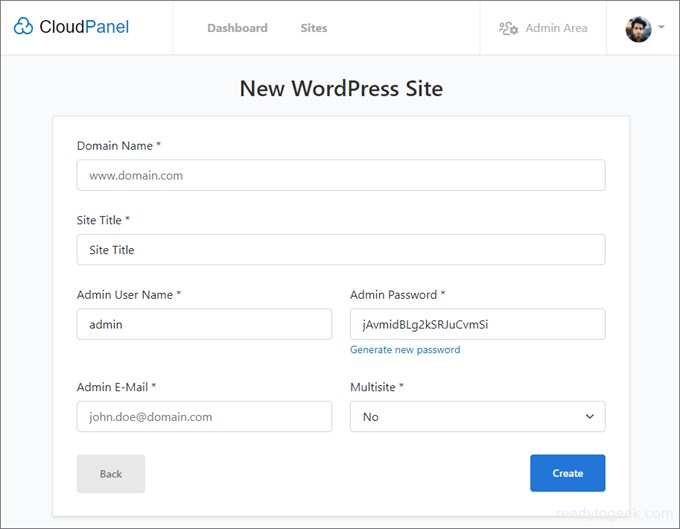
On the next screen, all the passwords will be shown to you to copy and store somewhere safe.
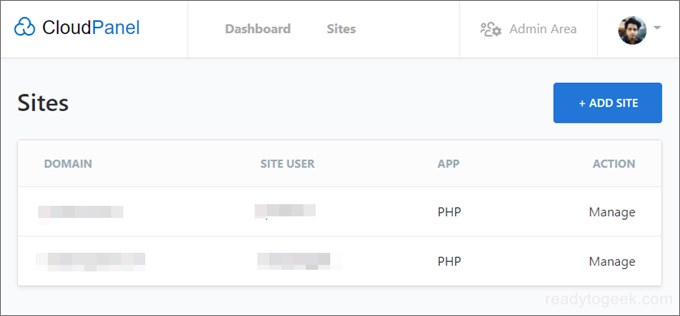
Now you can access all the sites on the Sites tab. Can manage that website by clicking on its name. And then you can enable Letsencrypt SSL and use all the other functions. If you want a specific guide please please use the comment section and I will try to be helpful as I can.
Oracle AMD processor instance (always free)
This instance comes with AMD 2.6 GHz processor (VM.Standard.E2.1.Micro) coupled with 1GB RAM and 0.48 Gbps network bandwidth.
Since this is a good processor you can run fully functional control panels like Plesk, Fastpanel, and managed control panels like Runcloud, Ploi.io, and Serverlipot. But the most interesting part is you can install Cyberpanel which is based on an Openlitespeed web server, Nginx is been used by 48% of top 10k websites while OLS is used by 2% of top 10k websites.
| Nginx | Openlitespeed |
|---|---|
| Performs better than Apache | Performs better than Nginx |
| Used by 48% of top 10k websites | Used by 2% of top 10k websites |
Create Oracle Cloud account and set up an Instance.
Once the Instance is up and running, SSH to it and type
Sudo -i to act as root and Sudo su – for cyberpanel.
wget -O installer.sh https://cyberpanel.net/install.sh
Now run installer.sh.
sh installer.sh
This is a bit different from what is mentioned on the official Cyberpanel Support website but due to some compatibility issue, you’d be needing this command to install Cyberpanel. The default command script doesn’t take input response and starts over.
Install WordPress Using AAPanel
Below this, the guide doesn’t have screenshots.
sudo -i will be used to give commands as a root user.
Option 1. AApanel, best for Litespeed, Nginx and Apache web-server
wget -O install.sh http://www.aapanel.com/script/install-ubuntu_6.0_en.sh && sudo bash install.sh
In CentOS/Debian/Fedoraq
yum install -y wget && wget -O install.sh http://www.aapanel.com/script/install_6.0_en.sh && bash install.sh
Perks, automatic WordPress installation, though you’ve to go an extra mile.
Install WordPress Using HestiaCP
HestiaCP – for Apache web server with Nginx as the proxy server.
OS Image: Ubuntu 20.04
Processor: ARM Ampere, (up to 4oCPU and 24GB of RAM.
Step 1. Create an ARM instance and don’t forget to add an SSH key to it.
Step 2. Open Putty and log in with the SSH credentials, you’d need to log in as ubuntu instead of root, then you type sudo -i to act as root user.
Step 3. Install HestiaCP
Paste this script and HestiaCP will be installed in a few minutes, once done.
wget https://raw.githubusercontent.com/hestiacp/hestiacp/release/install/hst-install.sh
and then type the following
bash hst-install.sh
The above script will ask your for your input throughout the installation process.
If you prefer you can select the unattended setup with the following string
bash hst-install.sh –interactive no –email email@domain.tld –password PASSWORD –hostname ANYTHING.com -f
Replace the bold words with your information.
Once the setup is done you can access the HestiaCP in a browser and use the password and username you set earlier.
The default user login doesn’t allow multiple website installations for that you have to create a new user and login into that.
You should allow port 8083 to access Hestia Control panel.
Visit ANYTHING.com/IP ADDRESS:8083 in your browser and use the credentials to log in.
With this method, you’ll have an Apache web-server with Nginx as a reverse proxy server.
Option 2. Webionly
There won’t be a User interface for this control panel, it only works with Commands and I don’t prefer it.
wget -qO weby qrok.es/wy && sudo bash weby
sudo site example.com -wp -cache=on
sudo site example.com -ssl=on
These commands will create a WordPress site with SSL and Fast-CGI cache on an Nginx server. In the LEMP stack, you will get MariaDB instead of MySQL database, of course in the case of WordPress MariaDB performs better.
FAQ
FAQ.
AMPERE Based Instances after a free trial.
The instances will be deleted by Oracle, you can spin new Instances but can not migrate old (created in the free tire) to new ones. This doesn’t apply to Micro AMD instances.
What is included in Always free resources:
AMD processor: Two VM.Standard.E2.1.Micro shape, which has an AMD processor. Comes with a default 47GB of boot volume size. So you can create two instances that will consume 100GB of boot volume space.
Ampere A1 Compute instances (Arm processor): first 3,000 OCPU hours and 18,000 GB RAM hours per month.
What’s the catch?
1 Instance with 4 OCPU and 24GB RAM and 200GB volume
Or 4 x 1OCPU + 6GB RAM, 200GB volume (47GB each)
Or 2 x 2OCPU + 12GB, 200 GB boot volume (100GB each)
Or any combination 100GB volume each. 1OCPU comes with 47GB boot volume, so you can spin 2 1OCPU instances along with two AMD Micro instances, that’ll consume 200GB boot volume.
Note: The boot volume allowance you’ll be getting in always free tier is 200GB, so if you create a 4 x 1OCPU Ampere instance you can not create an AMD instance for free, because the limit of 47GB volume x 4 = 200GB will be reached.
ref: https://docs.oracle.com/en-us/iaas/Content/FreeTier/freetier_topic-Always_Free_Resources.htm