Create a Local User Account in Windows 11 (Without a Microsoft Account)
Setting up Windows 11 usually requires a Microsoft account. But did you know you can create a local account instead? This step-by-step guide shows you exactly how, giving you more control over your PC.
Advertisement
While setting up Windows 11 typically involves using a Microsoft account, you might prefer the added control and privacy offered by a local account. This guide will walk you through creating a local account in Windows 11, giving you a familiar login experience without needing a Microsoft account.
There are the usage of the article.
- Create a User account without Microsft.
- Swith to a Local Account from Microsoft Account.
- Install Windows 11 witha local account duing Setup
Perks of a Local Account:
- Privacy: Local accounts don’t require syncing data to the cloud, potentially offering more privacy. Meaning you could stay off the grid with minimum data shareing with Microsoft.
- Offline Use: Local accounts function entirely offline, useful if you have limited internet access. The benifit is you would not require a password everytime you login. Simply left the password prompt empty when asked and press Enter.
- Multiple Users: You can create multiple local accounts on your PC for different users. As many people don’t like when someone iterfare with their system, with a guest account, other people can also access the system.
Things to Consider:
- Limited Features: Some Windows 11 features, like automatic updates and Find My Device, require a Microsoft account. But you can then login with a Microsoft account and choose “Microsot Apps only” when a MS account is needed.
- Security Updates: Local accounts may require manual installation of security updates. This is not the case anymore, you would receive the updates regardless of Local account or Microsot account.
Creating a Local User Account in Windows 11
- After Initial Setup:
Despite the obstacles (Microsoft put in), it is still possible to create a local user account in Windows 11, and here’s how you can do it:
- Start by opening the Settings app. You can do this by clicking on the Start button and selecting ‘Settings‘.
- In the Settings window, click on ‘Accounts‘ and then ‘Family & other users‘.
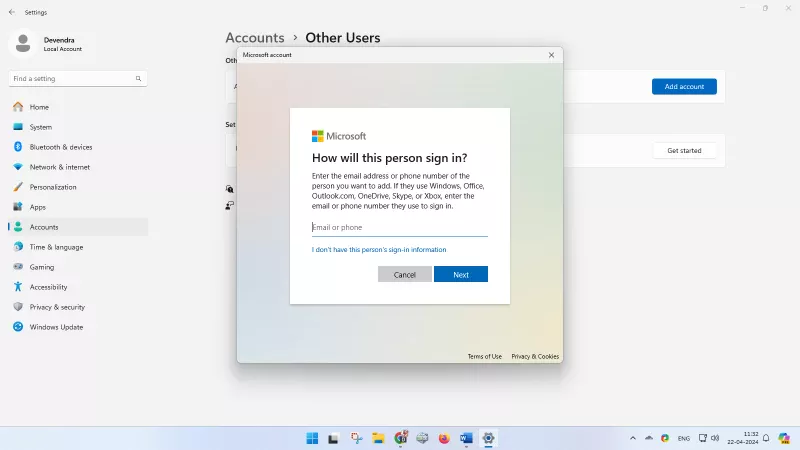
- Under the ‘Other users’ section, click on the ‘+ Add account‘ button.
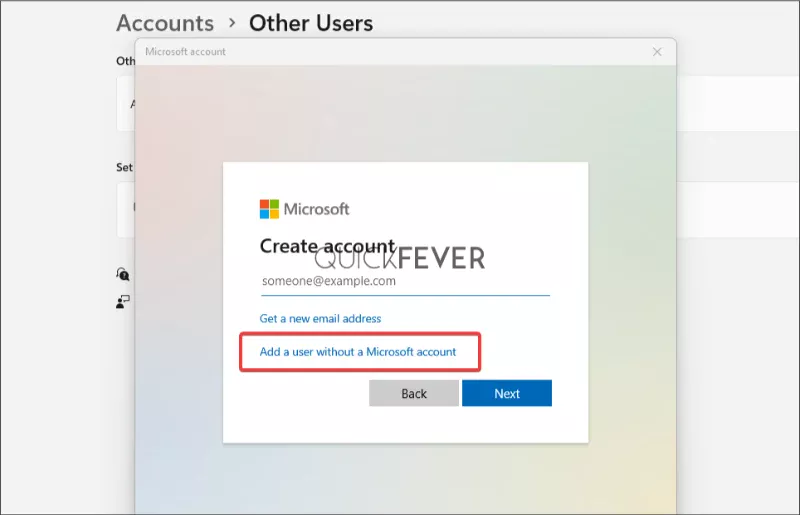
- A new window will open asking for the Microsoft account email. Instead, click on the ‘I don’t have this person’s sign-in information‘ link at the bottom.
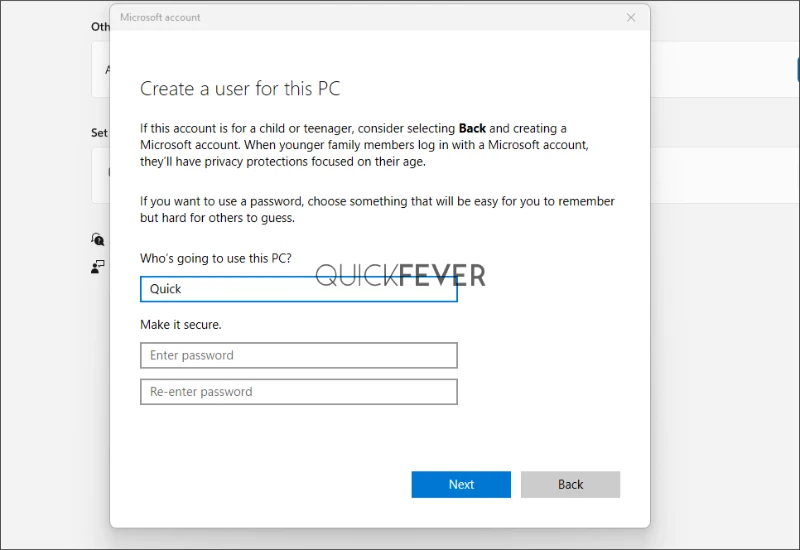
- On the next screen, click on the ‘Add a user without a Microsoft account‘ link.
- You will then be prompted to create a username and password for the new user account. Fill in the details and click ‘Next‘.
Congratulations, you have now created a local user account in Windows 11!
Remember:
- Choose a strong password for your local account to ensure security.
- Consider creating a separate administrator account for tasks requiring elevated permissions.
By following these steps, you can create a local account in Windows 11 and enjoy the benefits of a more traditional login experience. Just remember the trade-offs in terms of features and updates.
Creating a Local Account in Windows 11:
- During Initial Setup (when clean installing Windows 11)
- If you’re setting up a new PC, during the initial setup process, you’ll see a screen prompting you to “Add your Microsoft account.”
- Click on the text that says “Sign-in options” (located below the entry field).
- Select “I don’t have an internet connection” (even if you do). This might seem counterintuitive, but it’s a necessary step.
- Click on “Continue with limited setup” on the next screen.
- You’ll now be able to create a local user account by entering a username and password.
The Downside
However, not everyone is thrilled about this. For some users, the convenience of cloud services does not outweigh the perceived loss of control over their personal data. A local account can be seen as a more private option, as it does not require any form of online registration or data sharing with Microsoft. However, it is important to note that using a local account does limit access to certain features that require a Microsoft account, such as the Microsoft Store and synchronization of settings across devices.
Why so much obsitacle in this
it’s important to understand why Microsoft has made it somewhat challenging to create a local account in Windows 11. Microsoft is heavily promoting the use of Microsoft accounts for Windows 11. The main reason behind this is to encourage the use of their cloud services, such as OneDrive, and to provide a more personalized experience for users across multiple devices.
- The OneDrive is preinstalled and preactivated if logged with a Microsoft Account.
- The buttons are somewhat forces you to sign-in using Microsoft Account. You need to pay close attention. AS most people would just give their concent to Microsoft to use Microsoft Account on their Windows 11 PCs.
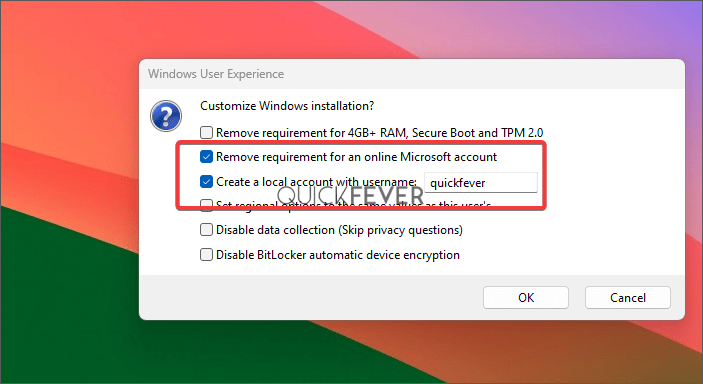
Clean Install Windows 11 24H2 with a Local Account
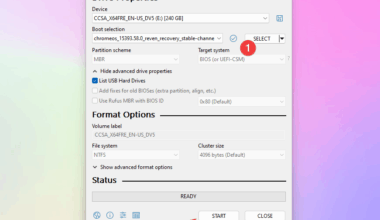
To create a bootable USB for installation purposes, we will utilize RUFUS, our preferred tool for making bootable USB drives.
RUFUS is a reliable and user-friendly software that facilitates the process of creating bootable USBs. Follow the steps below to create a bootable USB using RUFUS successfully:
Step 1. Get the ISO file ready.
Step 2. Open Rufus, and browse the ISO file.
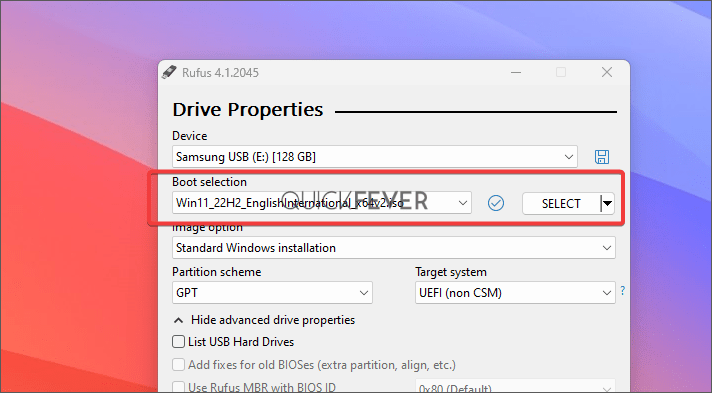
Step 3. When you click on start a prompt will appear, one of the options is “Create a local account with…” Give a local username and click on start.