In this tutorial, we used DigitalOcean server based on Ubuntu 20.04 to install Cyberpanel, (OpenLiteSpeed server control panel) with plenty of features like Auto SSL, MariaDB, DNS manager, and PHP 8.0, that’s crazy. Our goal here is to make a WordPress blog on around $5-6 server plan that can handle an insane amount of web traffic thanks to PHP 8.0+LSCache plugin+openlitespeed+Let’sEncrypt+Cloudflare (optional).
More features are Rainloop; email server, multiple website support; install multiple blogs (WordPress, Joomla), Advanced file manager with FTP support,
What is OpenLitespeed?
One of the fastest webserver solutions out there is Litespeed. You shouldn’t be confused between OpenLiteSpeed and LiteSpeed; both are the same and share the same functionalities and features. The term open stands for open-source and free. You can install OpenLiteSpeed on any VPS server running on fresh Ubuntu 20.04 or CentOS 8.x. VPS will be now managed by Cyberpanel, a web interface to control OpenLiteSpeed.
What is CyberPanel?
Cyberpanel is a control panel of OpenLiteSpeed where you can manage your websites, install WordPress, and much more. In fact, you do not need CyberPanel in order to Install WordPress on an OpenLiteSpeed web server (but with Cyberpanel you can install WordPress in a single click) With CyberPanel you can manage SSL, create more websites, change PHP version up to 8.0, access files via builtin File manager, and much more, so I recommend CyberPanel.
Now that we are using CyberPanel to manage the OpenLiteSpeed web server. When you install CyberPanel, you are actually installing the OLS-web server along with LSCache and other features that you can set up later.
The whole setup is not so difficult, you just have to install the cyberpanel.
What is LSCache
LSCache is a built-in Openlitespeed cache solution. The plugin also works with Apache, Nginx server but there are features that only work on OpenLiteSpeed server.
Prerequisites
VPS server running on Ubuntu 20.04 (any LTS) or CentOS 8.x And 5$ DigitalOcean server should be enough to handle a high-traffic WordPress blog.
That’s it.
1. Create a VPS server
Free credit active: You have $50 credit! Create CyberPanel Droplet on DigitalPanel
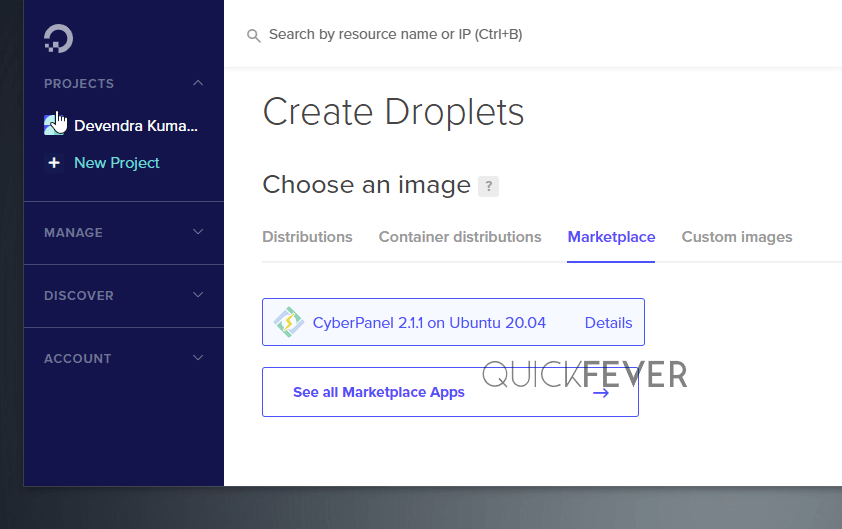
Option 1.a Create One-click CyberPanel server via DigitalOcean Marketplace
Jump to option 2 – Create normal server
Log into your DigitalOcean account to any other VPS hosting provide an account. Create a new Droplet and select CyberPanel on ubuntu 20.04 (as shown in the image). When you choose DigitalOcean 1-click CyberPanel, it’ll be ready in one or two minutes. You can start with the cheap $5 plan, but I recommend you to choose atleast 2GB RAM plan.
Use the below link to quickly select Cyberpanel 2.1.1 on Ubuntu 20.04 on DigitalOcean
https://cloud.digitalocean.com/droplets/new?onboarding_origin=marketplace&image=litespeedtechnol-cyberpanel-20-04
Of if you prefer Vultr hosting.
https://www.vultr.com/marketplace/apps/cyberpanel
Other things you want to do are the following.
- Tick a One-time password option.
- Tick Monitoring for better graph data.
- Give your droplet a good name.
Option 1.b Create a normal VPS server
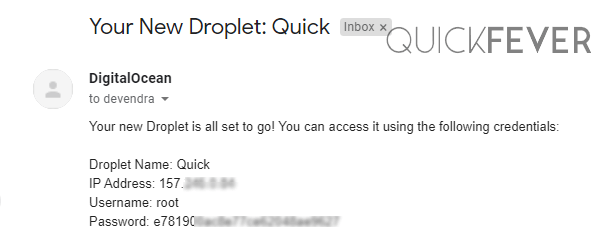
Open DigitalOcean dashboard, Click new and create a server instance. DigitalOcean sends an email with the server IP address and password to log in as root. While Vultr shows this information on their website dashboard.
2. Install CyberPanel
Skip This if you installed one-click CyberPanel with 1-click DigitalOcean or Vultr Marketplace (jump)
CyberPanel Installation: If you did not install CyberPanel with DigitalOcean marketplace or using any other VPS (Linode, Vultr), or don’t want to use DigitalOcean marketplace images you can manually install CyberPanel. A fresh Ubuntu or CentOS 8 VPS server is required for that.
Step 1 of 4.
Open an SSH connection using PUTTY or similar software and run. Type the IP address and select port 22. Now click on open. If you don’t want to use any software, open Command Prompt in Windows 10 and type ssh root@serverIP the interface is identical in both CMD and Putty.
Tip: you can use Windows’s Command Prompt to access your server, use ssh root@IP_Address
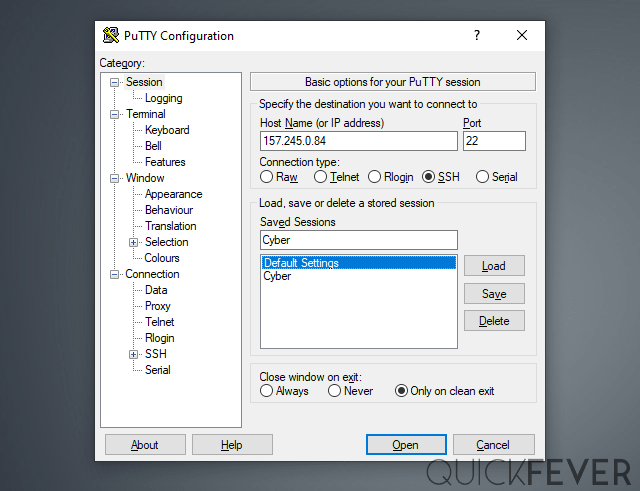
A terminal window will open type root as username and password which you got on your Email. You need a VPS server IP address and SSH password. Vultr server password can be obtained directly through their dashboard, DigitalOcean and others may send this information via email. You may have to set up a login key at the time of Server creation (such as Oracle cloud, Google Cloud).
Step 2 of 4.
The terminal will show you important links and a few other things you might need if you’ve used a one-click CyberPanel instance.
Need to install CyberPanel on an empty server, follow this procedure.
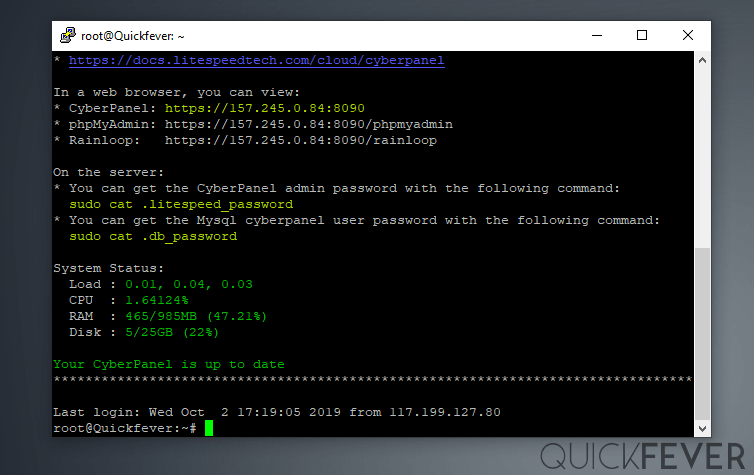
Since we have installed CyberPanel, the page will display the version information and command which you can use to show the CyberPanel password. But if you installed plain Ubuntu /CentOS you can follow the given instruction.
Step 3 of 4.
Type the following command to install CyberPanel.
Now just follow the on-screen options. Just to cut out steps, use the following to install CyberPanel. The new version may have slightly different options.
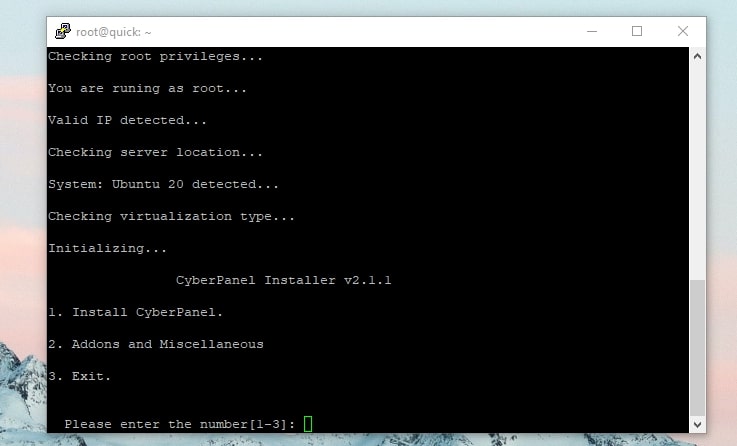
Step 4 of 4.
Select these options 1 > 1 > r > y – y – Yes | remote database: N
The process took 6 minutes to complete. Once done, the end result will have login details in this format, copy this with CTRL+C. If you plan to leave the SSH screen, go with the default password (1234567) option. Of course, you’re going to change it later.
Visit: https://(YOUR_SERVER_IP):8090
Panel username: example
Panel password: example
Mysql username: example
Mysql password: example
OPTIONAL 2.1. Update CyberPanel and OpenLiteSpeed
Very Important: It will install the latest Cyberpanel 2.x with stable OpenLiteSpeed version 1.6.x, you can upgrade both with following commands, which is optional.
Step 1. Access server as root
Open Putty and enter IP address and other information. When asked login as a root user.
Step 2. Updating Cyberpanel.
Update CyberPanel
Open an SSH connection and type. Use PUTTY to open SSH connection.
sh <(curl https://raw.githubusercontent.com/usmannasir/cyberpanel/stable/preUpgrade.sh || wget -O - https://raw.githubusercontent.com/usmannasir/cyberpanel/stable/preUpgrade.sh)
Step 3. Update Openlitespeed version
Update OpenLiteSpeed
Update OpenLiteSpeed, open an SSH connection and type.
apt-get update && apt-get -y upgradeIt will update OpenLiteSpeed to the latest stable version.
OPTIONAL However, if you’re willing to test out the cutting-edge OLS version here is the command that you need .
wget https://openlitespeed.org/packages/openlitespeed-1.6.21.tgz
tar -zxvf openlitespeed-1.6.21.tgz
cd openlitespeed
./install.sh
This step is optional to install the latest version of OpenLiteSpeed, remember there is a difference between the latest and stable. A stable version should be used on live sites.
3. Access CyberPanel & Create a Website
Before you install WordPress make sure to set up your DNS records. Point your Domain A and CNAME records to DigitalOcean or another server’s IP address.
For this, you have to create a website by logging in with CyberPanel. You have to follow the given steps.
Step 1. Access CyberPanel dashbaord
1. Access CyberPanel by typing your IP address followed by IP:8090 in the browser. it’ll give a certificate error, click on Advanced and click proceed. If you haven’t saved this password check step 2.
http://0.0.0.0:8090 | replace IP address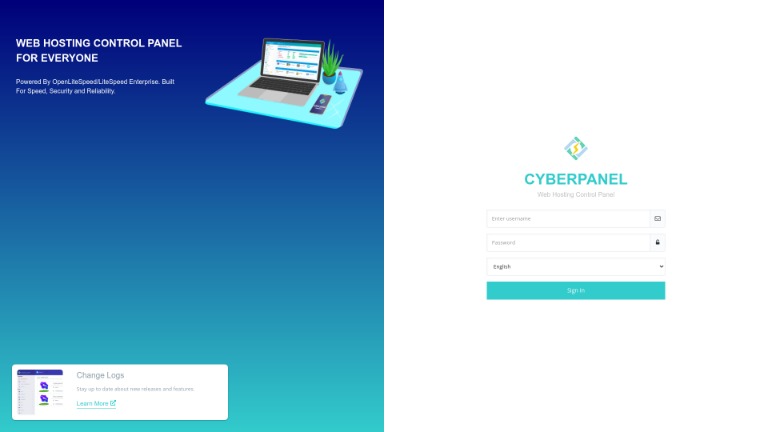
2. Enter the username (usually admin) and password which you got earlier.
You can type the following command to get the password to access CyberPanel. (Open SSH connection and type this command)
sudo cat .litespeed_passwordStep 2. Create a WEbsite in CyberPanel
Go to Main > Websites
- In order to install a blog, create a Website entry in Cyberpanel. This is not a WordPress installation, the WordPress installation will take place after this. Login to CyberPanel and click on the Website button.
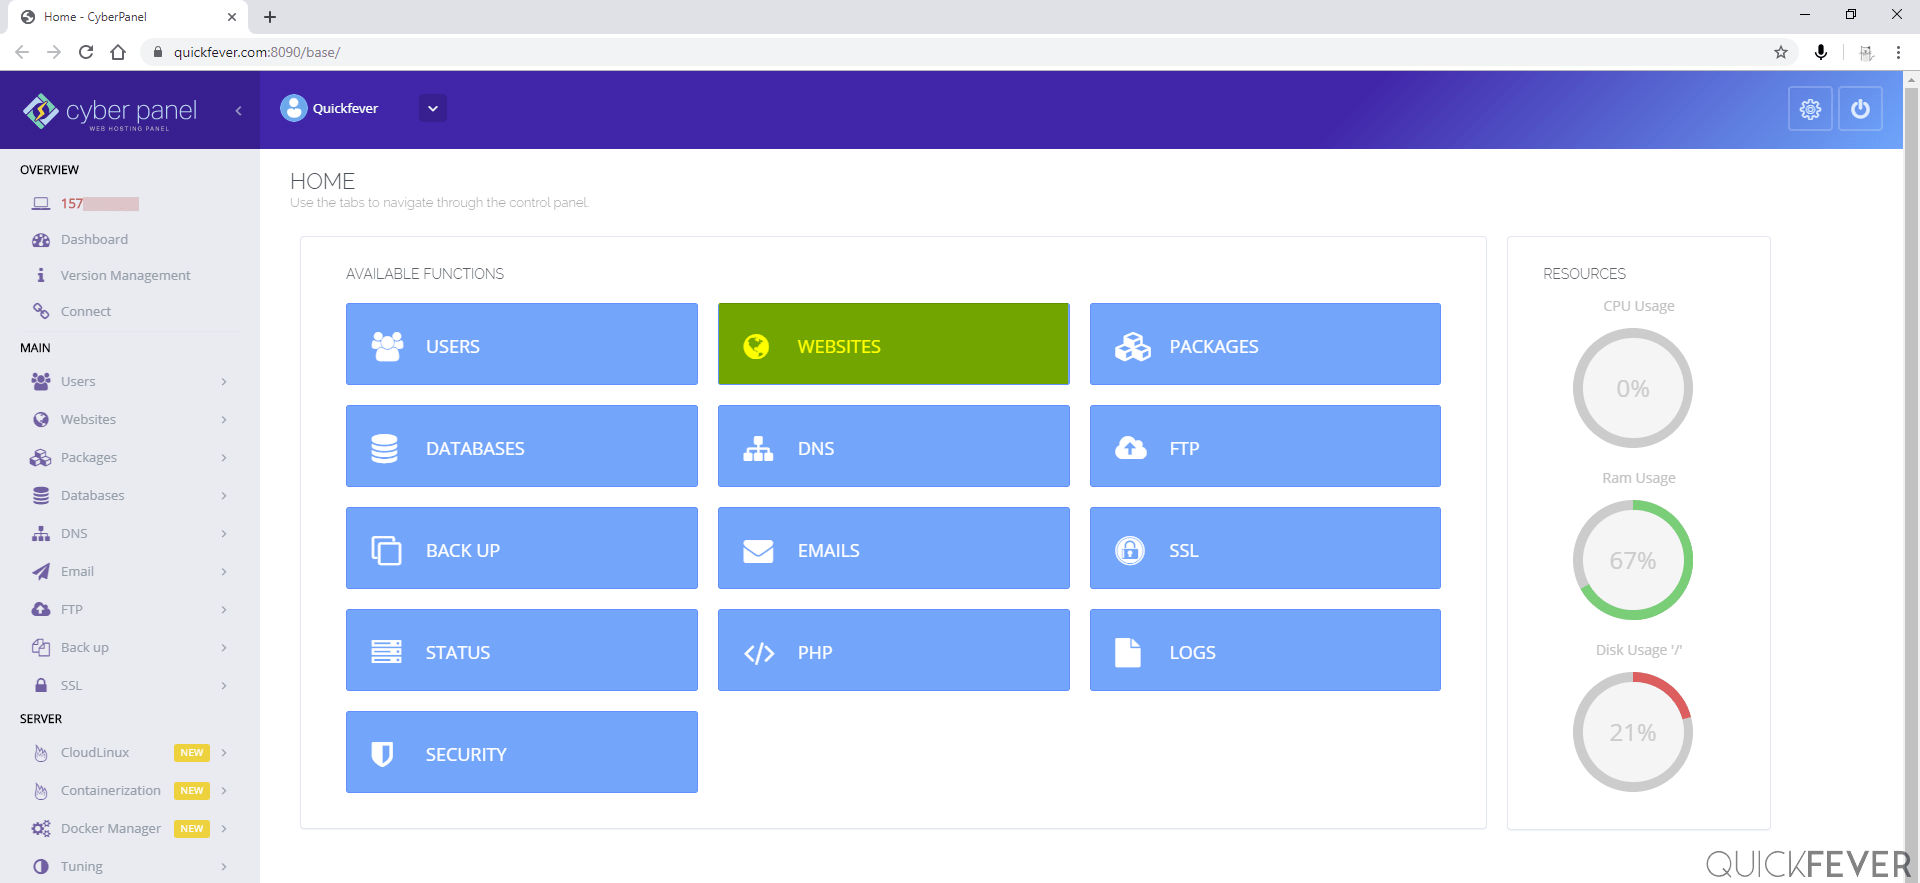
- Click Website and then click on Create Website.

- Select Default package and make sure to modify the package to let your WordPress site use maximum resources.
- Enter the details like your domain name, email, and PHP version. You need to enter the following details.
Select owner: Admin
Domain name: example.com
Email: Your email address will go here
Php: PHP 8.0
/* Additional features
SSL: If you plan to enable let's encrypt the free SSL tick option, we can always apply SSL anytime later.
DKIM: Helpful in email security.
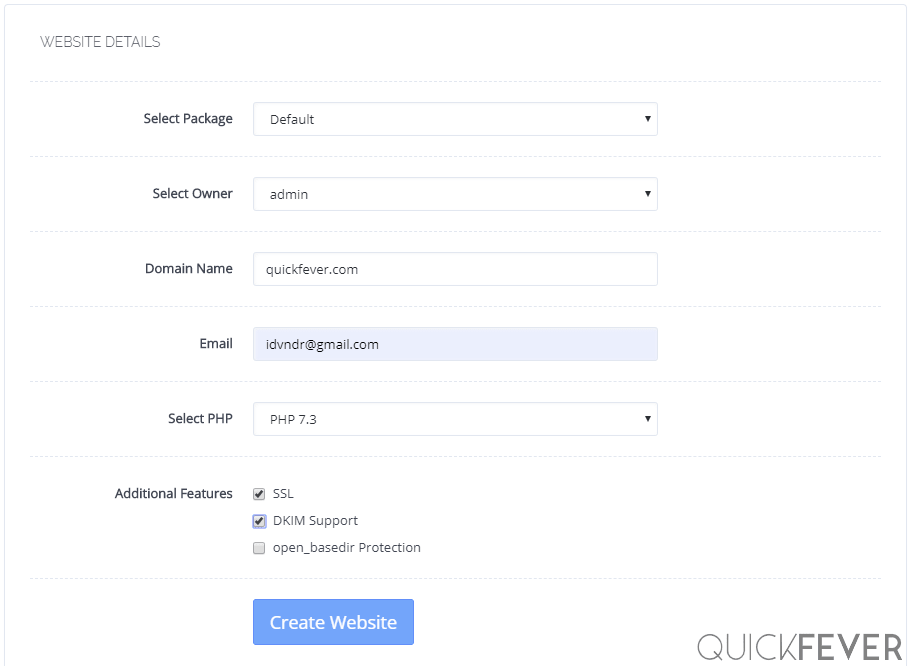
When you’re ready to go, click Create Website.
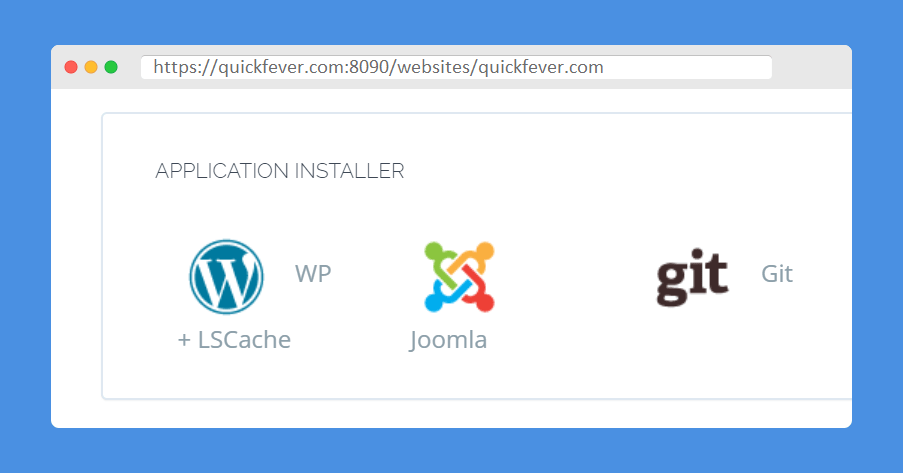
4. Install WordPress with LSCache on PHP8
The motive here is installing WordPress which is not really hard to do since we have a one-click installer here (which automates the user and database creation on MySQL).
CyberPanel > List Website > Example.com > Manage > Application Installer > WP + LSCache
The WordPress installer also can be accessed from this link. Make sure to fill your IP Address and domain name, (Domain name should be the same which you entered earlier during Website creation)
:8090/websites/exmaple.com/wordpressInstallFill the details.
Blog Title:
Login User:
Login Password:
Email:
Path: Leave it empty or your choice
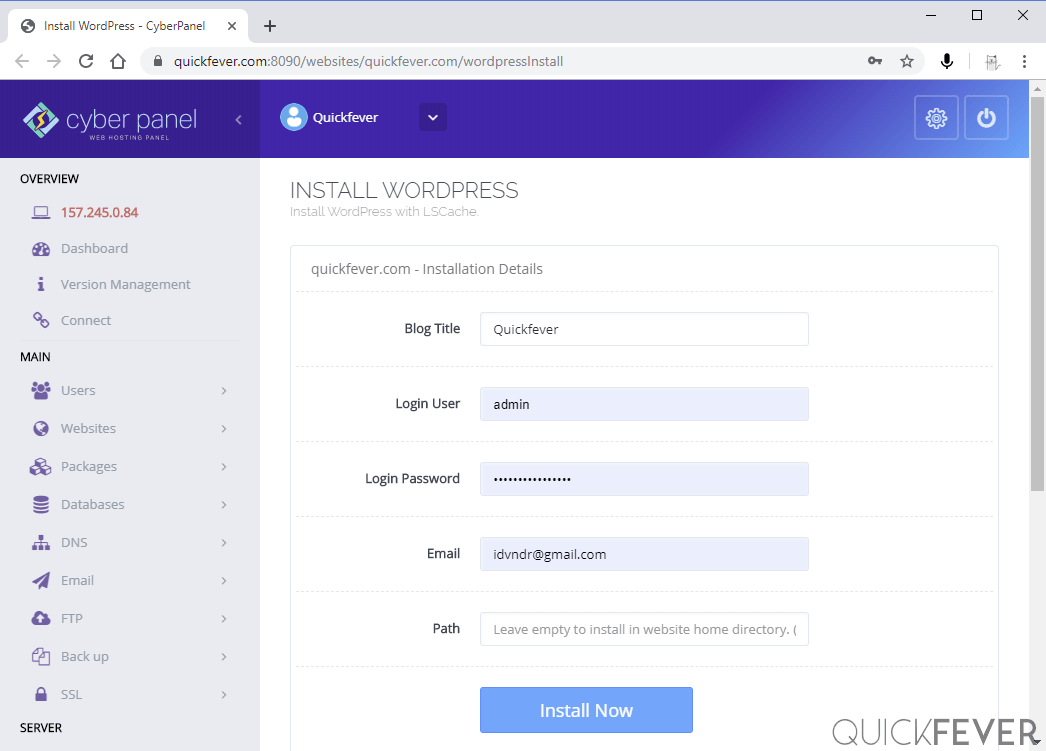
As soon as you hit the “Install now” WordPress will be accessible to that domain. It’s an instant process so you should not be waiting for anything now. You access the blog with domain.com/wp-login.php
5. Enabling LetsEncrypt SSL for Domain and CyberPanel
Point your Domain to the Server IP address. Ensure DNS is correctly configured using this dns checker site.
Login to the CyberPanel dashboard, and from the side panel access this location.
- Go to SSL → Manage SSL → Select website from dropdown → Click on Issus SSL
Access the CyberPanel dashboard with your Domain name rather than the IP address, go to SSL → Hostname SSL → Issue.
You should be able to access Cyberpanel using the following withoutany SSL error.
https://example.com:80906. Best LSCache Plugin Settings
The LSCache plugin is already installed, and you’re ready to customize it further. First, go to LSCache settings.
Enable Advanced Settings, and enabled the following settings.
- [5 Optimize] CSS/JS minify – combine – http/2 PUSH = ON
- [6 Tuning] Remove Query Strings, Remove WordPress Emoji
- [CDN 8] : Load Jquery Remotely > Google / CDNJS
- A wonderful article covering entire settings.
7. Restore old WordPress from old host
This section is not beginner-friendly as it requires advanced knowledge of SFTP software, archiving and extracting WordPress uploads directory from old to a new server.
If you plan to move to CyberPanel from an older WordPress installation, simply create Posts backup from Tools > Backup. Make a zip file of your uploads via SFTP or something. Move that ZIP file to CyberPanel and extract. Now restore the old WordPress backup.
The default restore file upload limit is 2MB, but you can change that from Cyberpanel dashboard.
Mange PHP → BASIC → 8.0 → post_max_size = 10 MB to upload backup files.
8. Benchmark CyberPanel
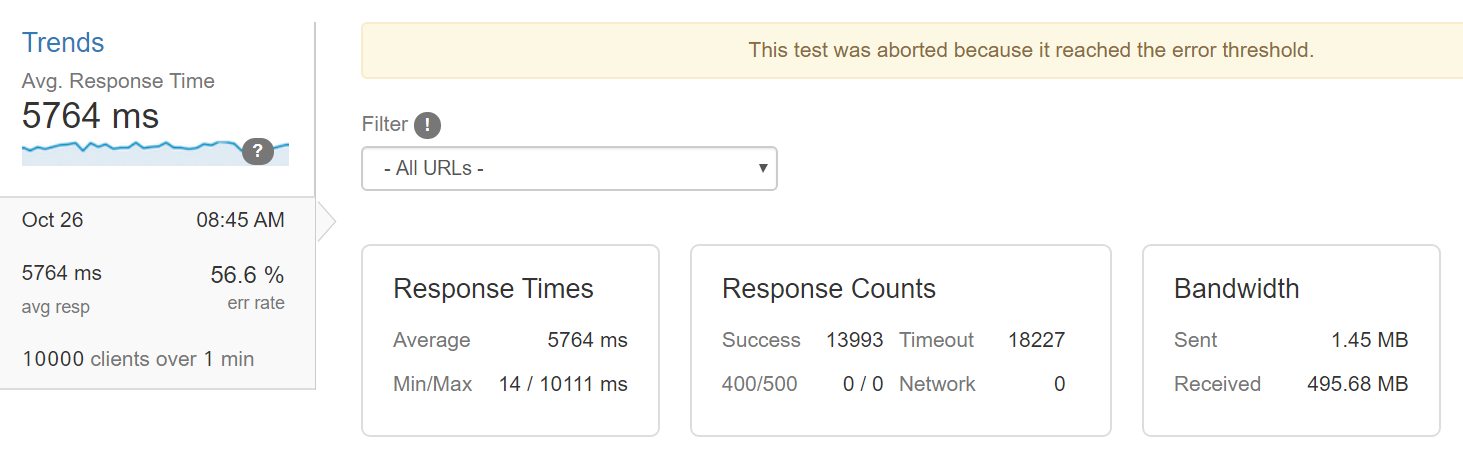
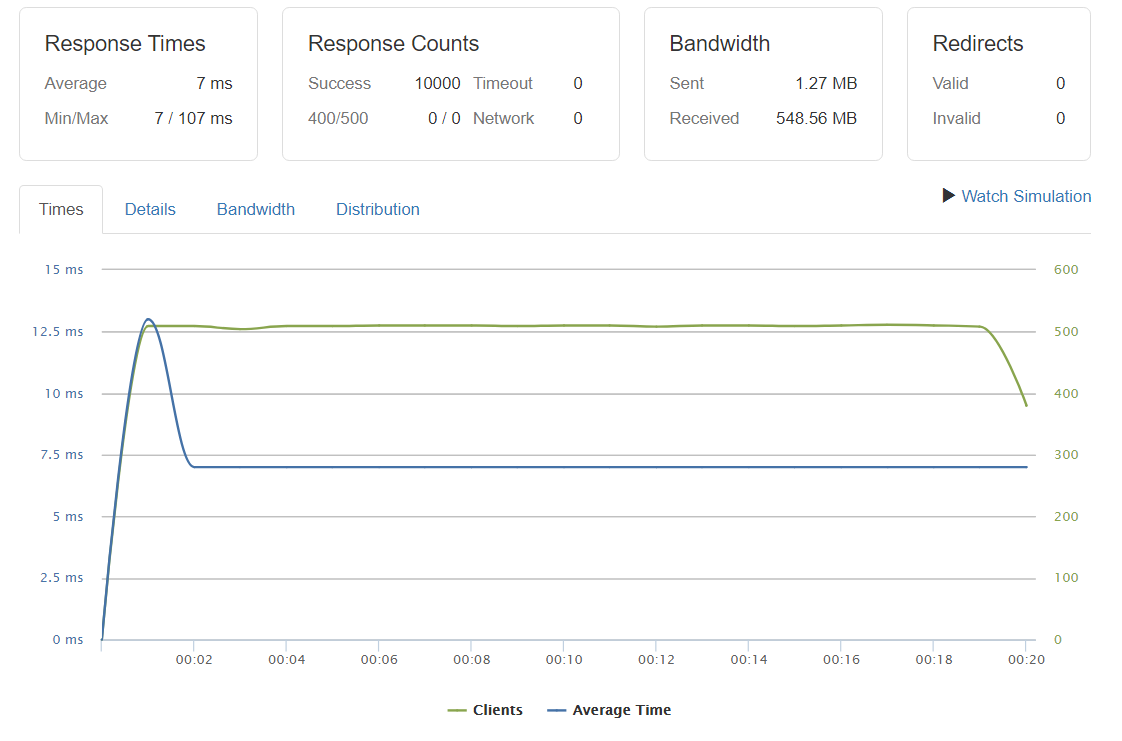
Test #1. 10,000 Client per second on the homepage
The avg time was 100ms.
Success: 13,9993 It was able to sustain 20,000 Client/second for the first 10 seconds.
Test #2. 10,000 Total Client on Post page
The Sucess rate was 100% with no timeout, I ran the test for 20 seconds.
The avg time was 13 ms for the initial seconds and later goes to 7 ms!
So, unless you’re getting more than 10000 hits per second on your WordPress site, the $5 Droplet with CyberPanel will take care of that.
And when you set up Cloudflare with the existing setup, the results are mouth watering.
Known Issues after installing CyberPanel 2.1
If you can’t access Cyberpanel dashboard, you can try the following command.
systemctl stop lscpd
systemctl start lscpd
Conclusion: CyberPanel really handles massive traffic on a $6 Server
There are multiple ways to install WordPress on a server. Previously, we published a guide WordPress with Runcloud with a free SSL trick. When I installed WordPress with CyberPanel, it really amazed me. It comes with website Backup feature and after scheduling for weekly backups I can focus on other things. CyberPanel is mainly for hosting solutions, but you can use it to have a blazing fast WordPress website powered by OpenLiteSpeed. The built-in LSCache will certainly help you handle high-traffic.
12 comments
How to increase WordPress speed (large site around 100k posts)
I have an wordPress site which has more than 100k posts. Its very slow.
I use theme Jannah By TieLabs
Plugin: WP-rocket, Advanced Database Cleaner PRO plugin etc.
But still it is slow. Can any one please give some tips to increase my site speed.
Thank you.
You can use Cloudflare and set a Rule to cache the whole page. That way your pages will be served through CF CDN for free.
Thanks for reply me.
I use VPS 6 cores, RAM 16GB
real time traffic about 100-200 users
News website, I do not need to comment form, do not need to update the content.
Is there any solution to unload databses ?
There are some plugins to clear junk from your database. But don’t play with them because it’s one-way road, you remove wrong entries and you may lose crucial blog information.
For traffic up to 200 /second, 2VCPU and 4GB RAM are more than enough, I’d suggest using Runcloud’s Litespeed server to power up your WordPress website and for hosting Vultr is perfect.
Thank you @Dev
If I already have an UBUNTU droplet on Digitalocean and WordPress running with a managed dbase – can i still install cyberpanel?
No you’ll need a clean Ubuntu server to work with Cyberpanel.
lol test
I’ve just done this for one of my websites and it’s running way quicker than on my previous VPS which was more expensive — so well pleased. The only issue I’m having is getting email to work — simply can’t receive/send email no matter what I try. I’ve looked for tips and pointers online to no avail. Wondering if you’ve managed to configure email for a domain on Cyberpanel? Are there step-by-step tutorials anywhere online for setup/troubleshooting mailissues?
HI, Calvin! you can try the hard method listed in Cyberpanel Docs or you can set up emails the easy way as I did, Install Zoho mail plugin (available in WordPress plugins store). Fill 5 simple details and done. If you need more help, feel free to ask.
Dear Sir,
Plz help
How can I use PHPMyAdmin if I manually install CentOs7 and Cyber Panel, because I have not received the password for PHPMyAdmin?
I’m sorry my English isn’t good.
Thanks!
Gopal Thakur
Hello, you can use PHPMyAdmin on Cyberpanel running on Cenos7.
SSH your server and type this “passwd: cat /etc/cyberpanel/mysqlPassword” it will show you the password.