How to Disable Virus and Threat Protection in Windows 11
Advertisement
Similar to Windows Defender, Microsoft’s Virus and threat Protection service scans files in real-time. There are multiple scenes where some tools and files that we trust are wrongly flagged by Microsoft for security reasons.
That being said, Windows 11 minimizes the actual need to install a 3rd party Antivirus because it got you covered with a larger database. The advice here we’d give is, to be careful with what you download and installs on your computer and you shall need no antivirus software.
Coming back to the topic, these files are generally flagged risky/harmful,
- Windows and Microsoft services activators
- UUPDump files
- Some ZIP files
- Registry files
What this service does is instantly remove and quarantine these flagged files which means you can’t have access to those files and therefore those files can not interfere with your computer.
However, you can particularly un-quarantine a file or even completely disable real-time scans for Virus and Threat Protection.
Un-quartine a perticular file
Mostly this happens when unzipping archive files and the system instantly bans it, this is seen aggressively with the Edge browser.
To prevent this from happening you’ve to follow these steps.
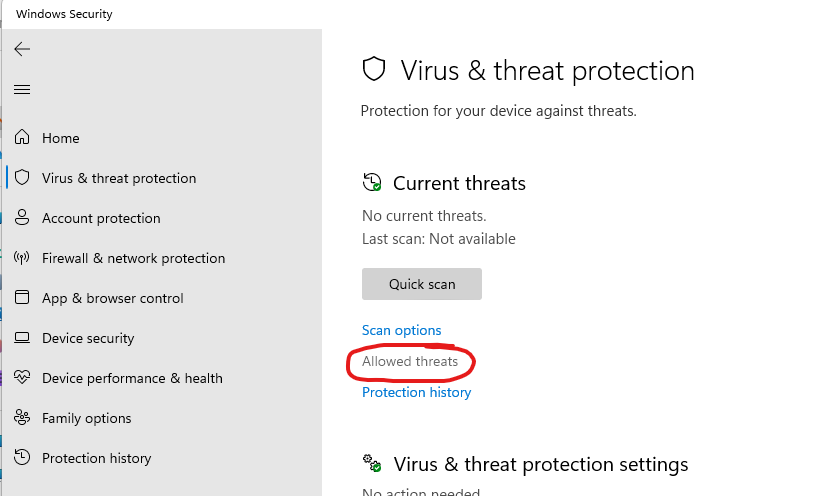
- Once the file is flagged as harmful you get a notification in the action center. Click on the notification and there you’ve options to mark the file safe and access it.
- Check all the allowed files here, there you can further block the file again.
Disable Virus and Threat Protection
Warning: Do this only when you know what risks you’ll be inviting.
You can disable Windows Defender service to disable Virus & Threat Protection. Here is a basic method to do so.
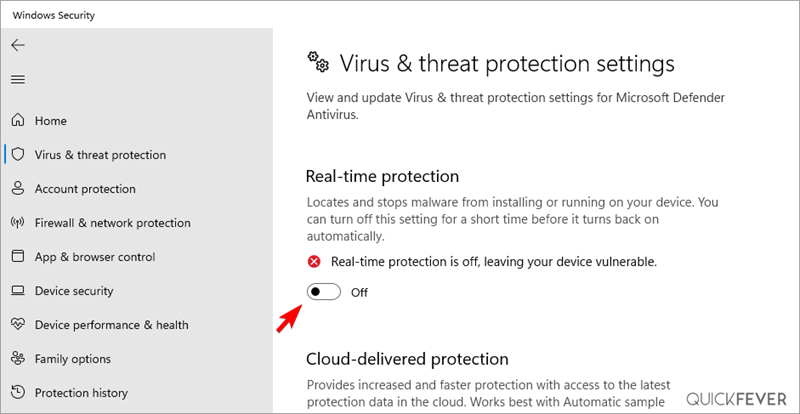
Navigate Windows Settings in this direction. Press Windows + I to Open Windows Settings.
Privacy and Security 🔏 > Windows Security > Virus and Threat Protection, settings > Manage Settings > Real-time protection > Turn off.
If that makes you upset, simply search “Virus & Threat Protection” in the search bar to jump to Manage Settings > Real-time protection > Turn off.
However, with a Windows restart, this option automatically gets enabled and there is no way you can bypass that without altering default system settings. That’s where you need to disable Windows Defender which disables Threat and Virus Protection.
That is all for today folks, we’re adding more Windows 11 tutorials over the upcoming weeks make sure that you’re subscribed to our RSS or Newsletter to get notified.
Wrapping it up.
Windows Defender does the job of protecting you from threats and malware, and it’s hard to bypass the mechanism. Just like any other AntiVirus’s real-time scan, it slows down the computer in case you’re using an HDD (slower than SSD).
Windows 11 ISO Download Direct Links or Windows 10 Version ISO Download