
Windows 10 virtual memory
Windows 10 is at its finest state where you can blindly install it hoping for the best Windows operating system yet. If you just installed the Windows 10, you might want to learn memory management to reduce performance and lagging issues. Here let’s see how to tweak virtual memory in Windows 10 and other memory related settings to fix such issues.
How to Adjust Windows 10 virtual memory settings:
Virtual memory is more like a physical RAM which is being used when the standard RAM runs out of usable space. This might have no meaning to the newer computers which have loads of RAM built-in. But helpful to older machine or machines having not enough memory. It improves the system stability and improves performance, and the same time it saves programs from crashing when the RAM is almost full. Windows 10 also uses the Physical memory profile to handle things if were out of memory.
Windows 10 can take care of itself depending and according to your computer. To fix any performance issues and to make the system more stable you need to fix the Windows 10 virtual memory management, follow the below steps.
1. Click on the Start icon or press the Windows key, and go to the Settings.
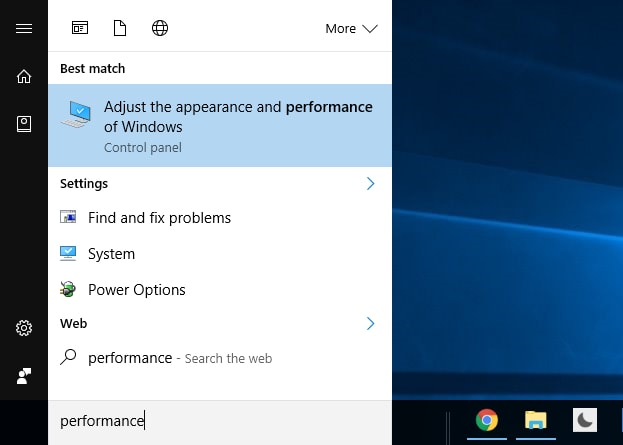
2. Start typing ‘performance‘ and choose the appearance and performance of Windows from the results. Or you can directly search ‘Performance‘ in the start menu search bar.

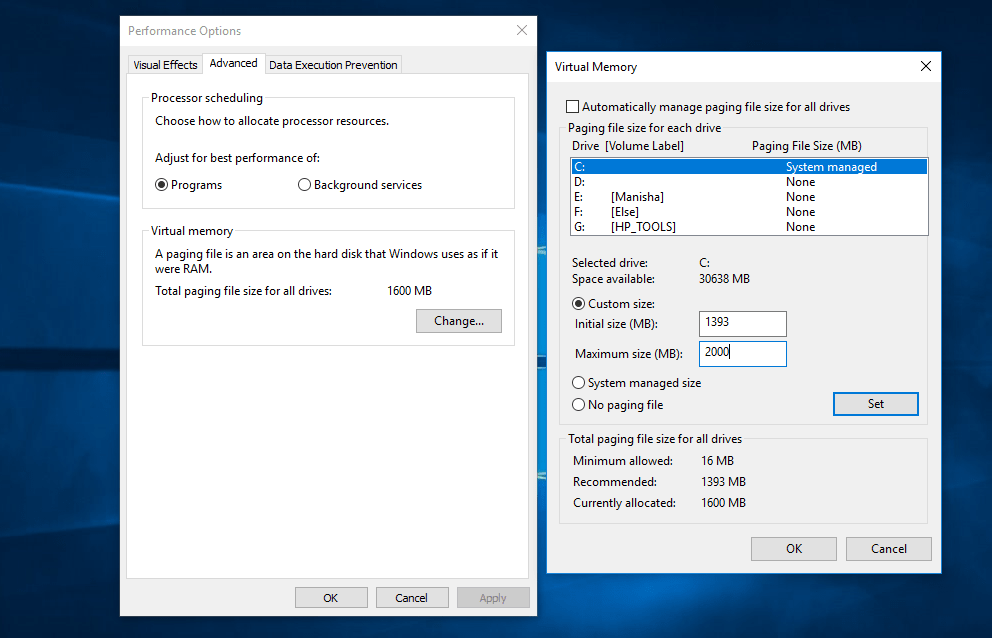
3. A window will open, switch to the Advanced tab, and you’ll see a Virtual Memory section, click on the ‘change‘ button. In the same window, you can see values at the end, those are the initial, recommended and the current value of virtual memory. You need to read that.

===
If you see that the current Allocated value, is less than Recommended value. Uncheck the “Automatically manage paging file size for all drivers” Then, select “custom size” and make changes according to these.
- In the initial size field enter the recommended memory value (find at the bottom of the box).
- In the maximum size field enter an amount higher than recommended value. But don’t make it to higher that could not be helpful and you might experience a worse situation.
- Once you are satisfied click ok to save your new Windows 10 virtual memory settings.
If you’re not sure about how virtual memory in windows 10 can affect its performance, we suggest you to make changes and see results accordingly.
More Windows 10 Tutorials and resources


5 comments
I would accept this is just conceivable through the PortalGuard SSO item. I don’t accept this is a local component of OS X.
Thanks for being so prompt and detailed devendra!!
i will BOOT from USB. can you share the iso, please?
i may not know how to DELETE or manage partitions
how to CREATE a new partition and install it? Need help here…
noted YOUR instructions about DISCONNECTing FROM the Internet
hope the intel site will auto detect the drivers needed for my pc.
thanks tons again…
sanjeeva
Hi Devendra!
You explain well! this was helpful!
can you help me resolve an irtitating bsod error please that I face with MY HP Spectre 360?
after every 3 minutes, the COMPUTER freezes, and then THE bsod comes… most of the times the stopcode reads critucal_process_died.
I’ve tried everything including the following:
1. CLEAN windows 10 REINSTALL
2. HP hardware checks on disk, memory, and COMPONENTS
3. SFC/ scannow
4. DISM restore health
5. 3rd party software uninstalls
6. 3rd party driver uninstalls/ updates
7. updates rollback/ uninstalls
8. the crystalinfo DISK check Also, which I cannot interpret.
can you help me please?
Thanks much
Sanjeeva
I Checked, this mostly happens with bad drivers. IMO, you should *Again* install Windows 10 version 2004 (I’ll get you ISO if you want) and follow these steps.
> Boot from USB.
Delete all partitions (Local Disc C, and there are other like 500MB and 200MB
(exclude the storage drives).
> Create a new partition and install it.
> Disconnect from the Internet and see if things work without graphics and other drivers.
And please stay away from drivers provided by HP. Download graphic drivers from intel. You don’t actually need other drivers.
check CMO battery, set machine machine BIO’s to default, defrag hard drive before reinstall.