Some tables in a Microsoft word document does not need full width. You can use horizontal position a table in the document and fine-tune its position by aligning it left or right on the page. In order to align any table to the left, center and right in Microsoft Word – follow these instructions.
How to Change a Table’s Horizontal Alignment
By using the guide you can quickly align your specific table to the left on the page, even to Center or right. One thing you need to know that if you are not using these alignment options, you see the table in full width. So if you have a table in your document that doesn’t need full width, you need to change the setting because by default when you create a new table, it is in full-width mode.
Though, the straightforward method to do it is clicking anywhere on the table to focus on it. Now take the mouse cursor to the bottom right side of the table it will change to resize arrow then you can drag to shrink the table to a size you want.
Now that your table is no longer full width, it is time you can apply alignment on this page. So what you are going to do it right click anywhere inside your table and choose table properties from the context menu.
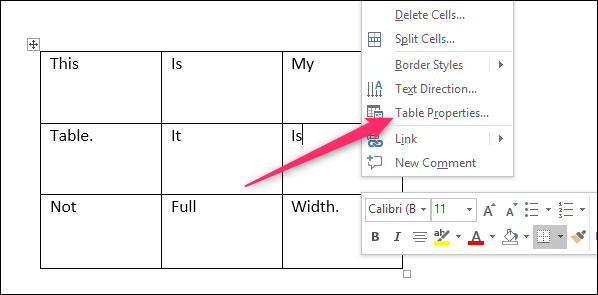
From the table properties, you can see three alignment option as left, Centre and right. So if you need to align your table to the left of the page you can choose this left option: The thing goes with if you want to align your table in the center of the page or to the right side.
While you are on this page you will also same is setting preferred width using that you can fine tune the width off the table and can set the specific width in either inch or centimeter. You can use this preferred width for example if you need a table just 300 pixels wide, it is a more accurate method then just clicking and dragging using your mouse pointer.
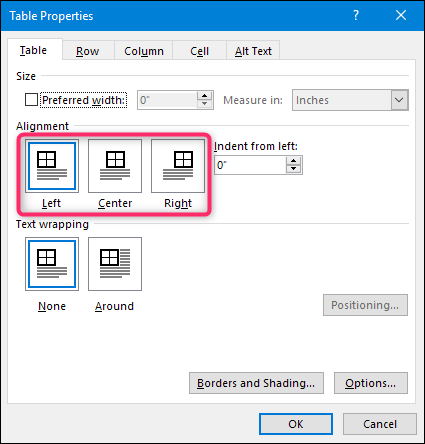
When you’re aligning the table, you can also adjust the space from the left side of the page using the “indent from left” option. The value you put here is in inches. Take this as margin, here we set the value to one inch which is similar to padding:96px;

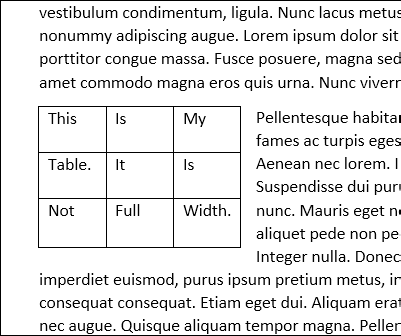
Below alignment option, you got another option which is text wrapping. If your table is more you can choose the around option this will rap wrap document text around the table. Text wrapping is similar to the float option in CSS. So if you decide to align the table in the left, the document text will appear to the right side covering the blank space. And if you chose to align the table on the right side, the document text appears on the left covering the blank area.

This is how a small table left aligned looks like with text wrapping.
So basically it is not very difficult to change the alignment horizontally of a table in Microsoft Word or Google word (Docs). Since many people use online tools such as Microsoft Word online (Unfortunately the online Microsoft Word doesn’t have the alignment option, despite it does have the alignment option, but it works only inside the table. So basically you cannot float a table to the left or the right.) and Google Docs, here is a similar approach to that as well.
In google docs
So in case, you are using Google docs (do you know you can voice dictate in Google Docs for speeding up your writing) you can align a table horizontally to the left, right and center. The process is similar to what we have done in Microsoft Word. Since Google doc runs online on a web browser, it has some limitations.
In google docs, you can not drag to resize table instead right-click it and choose “table properties” where you can set align to the left side on the document, to the center or right.
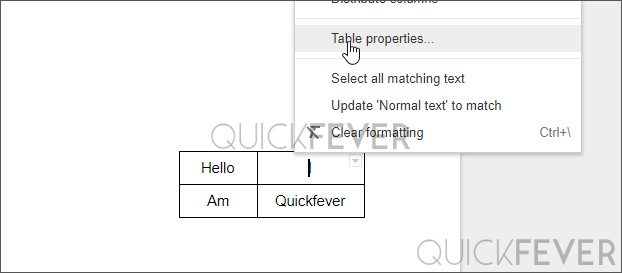
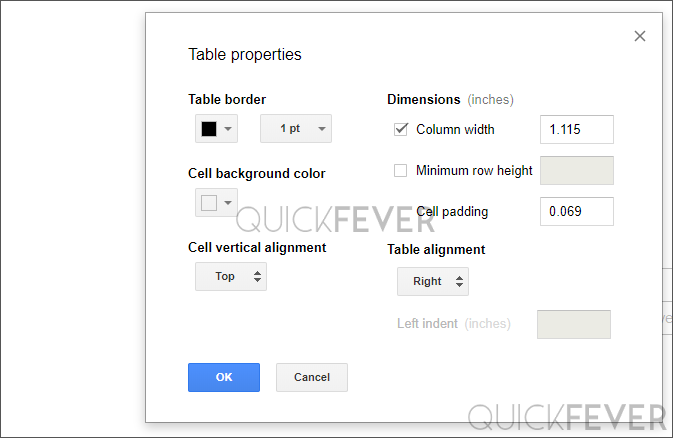
Under table alignment, you can set right to right-align your table. Also, you have some other options to tweak your table positioning horizontally. Dimensions are similar to the preferred width in Microsoft word. Here you can also apply a background color, thicker table borders, etc.
Alright, it was easy to align tables in Google Docs and Microsoft Word, you learned that knowing the options to fine-tune the looks of your table comes handy all the time.


