
ADB (Android Debug Bridge) and Fastboot (a protocol between phone and computer is a nifty command-line tool used to interact with your Android device from a computer. In this guide, we’ll show you how you can download and setup ADB on Windows 10 computer, using ADB and Fastboot, Installing Google USB driver along with resources and a step-by-step guide.
What are ADB and Fastboot?
ADB and Fastboot are the tools used to send terminal commands to your Android phone via a computer while connected through a USB cable. Although, both serve different functions but can be installed at the same time. Below is a quick breakdown of what these tools are and what do they do.
- Android Debug Bridge (ADB): This tool allows you to send a wide array of terminal commands — including but not limited to basic Linux shell commands, plus some specialty developer commands — to your phone at just about any time (as long as you have debugging enabled on your phone). You can send commands while the phone is turned on and booted, or even when it’s in recovery mode. While ADB is often used in conjunction with rooting or modifying your phone, you can use ADB to send terminal commands to unrooted devices as well. ~ Lifehacker
For example, you can copy files from your computer to Android storage by using “ADB push ironman3.Mkv /sd card/Movies/” command.
- Fastboot: a protocol between phone and computer. When you need to modify your phone’s firmware, Fastboot is the tool you need. This allows you to send commands to the bootloader, which means you can flash/modify things like custom recoveries. You can’t flash whole ROMs with it, but it’s helpful for many things that ADB can’t do. Fastboot isn’t enabled for all phones, so you may have to check your specific device. ~ Lifehacker
You can flash a custom recovery using “fastboot flash recovery twrp.img” (twrp.img should be located in the same folder).
Both of these tools come with the Android SDK. However, that’s an extremely large download that, frankly, most users who are interested in ADB and fastboot don’t need. Fortunately, Google recently made it easy to get these two without all the junk.
Install ADB and Fastboot tool on Windows 10
Google made a relatively small package called “Platform-tools” that includes ADB and Fastboot along with some other utilities.
Step 1. Download Google SDK Tools for Windows 10
Google named Platform Tools package that includes Fastboot, ADB and other utilities. To download the Platform-tools package visit this page, These are the separate package for Windows, Linux, and Mac.
Tip: direct download the ADB tool for Windows.
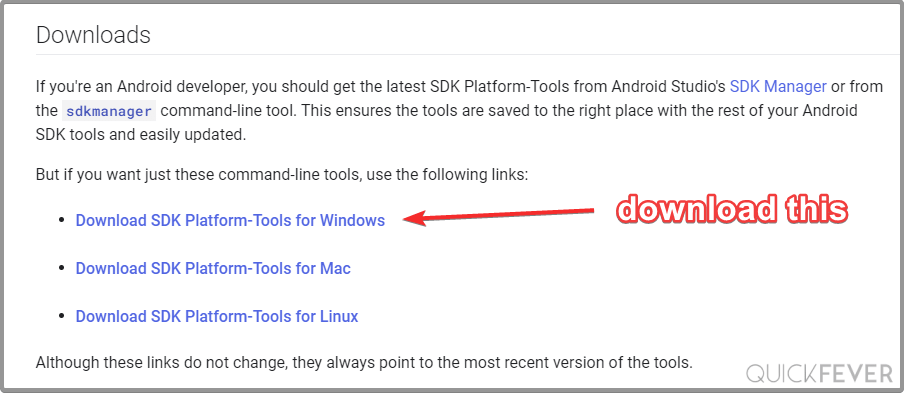
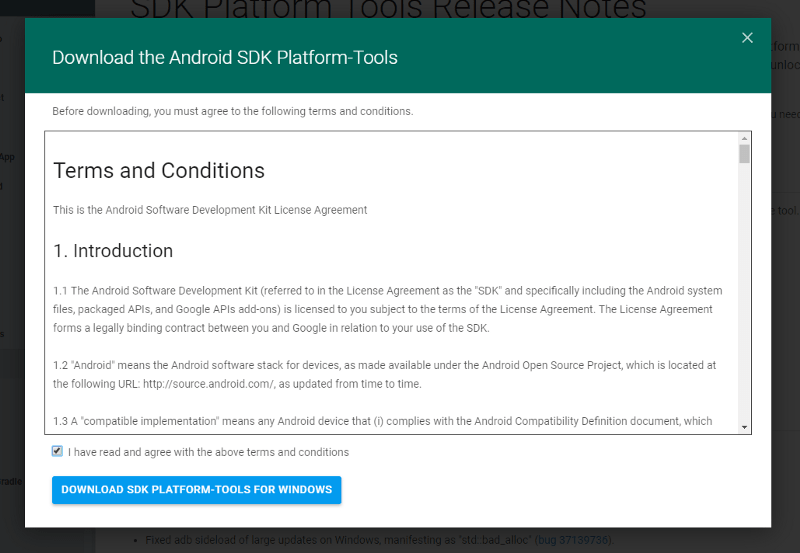
Choose an appropriate version of the Platform tool, select terms, and click on the big blue button to download.
Step 2. Run
Navigate to the Platform Tools folder, Right-click, and choose “open command prompt” from here. If you see Powershell option instead on the command prompt, use this guide.
To use ADB commands you must enable “USB Debugging” feature on your phone. Otherwise, it won’t work.
ADB commands Application
Install an Apk
You can install an apk file (stored on your computer) to your phone using this command
adb install path_apk
more at Android Studio
Pulling/pushing a file
Use “adb push filename /path” to send the file to the mobile device.
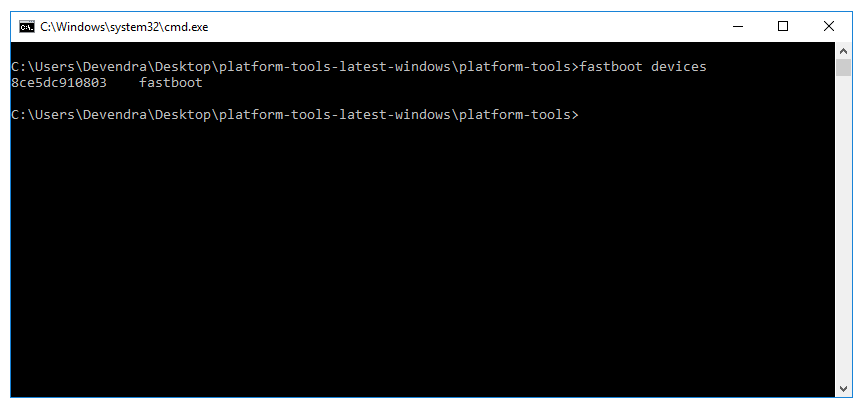
For starters, I used the “fastboot devices” command will display all the connected devices which are in fastboot mode. For example to enter in fastboot mode in a Xiaomi device you have to turn off the phone, start it pressing Power + Vol Down simultaneously.
Step 3. Optional, Modify Adb Path
- Open “Advanced system settings.”
- Click “View Advanced system settings.”
- Click the box that says “Environment Variables.”
- Under “System Variables” click on the variable named “Path.”
- Click “Edit…” and enter ADB folder location.
Install ADB and Fastboot Drivers
Google USB drivers are required to perform ADB debugging with Android devices. Generally, when you connect the Android device to Windows 10, it will automatically download drives via Windows update. But in case it didn’t
- Click to download the Google USB Driver (8MB ZIP file)
- After download, extract the ZIP file.
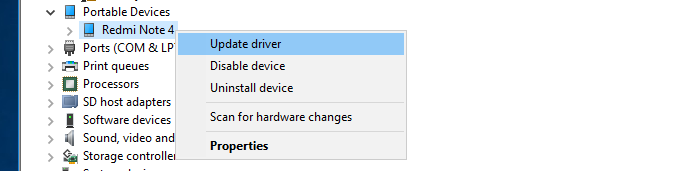
- Open “Device manager”.
- Find Portable Devices.
- Right-click on your phone name and Update driver.
- Select Browse my computer for Driver Software.

- Now Navigate to the driver folder using the browse button. Select the extracted folder and click on next.
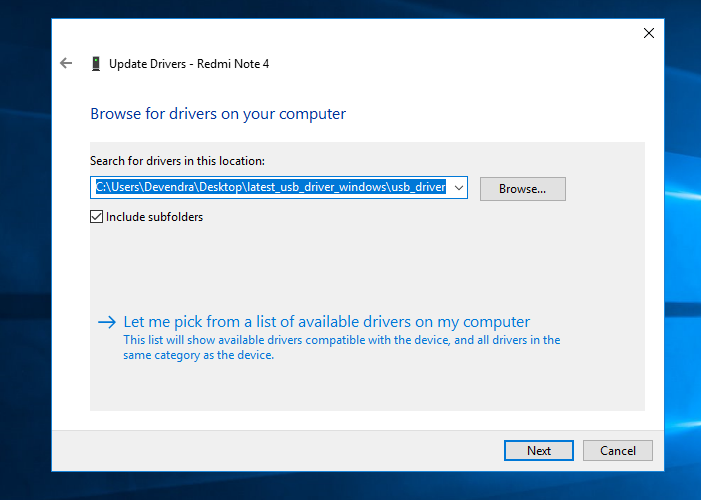
If everything goes right Google USB driver should be installed and your computer will recognize your phone just fine.
Install Android Bootloader Interface through Windows update
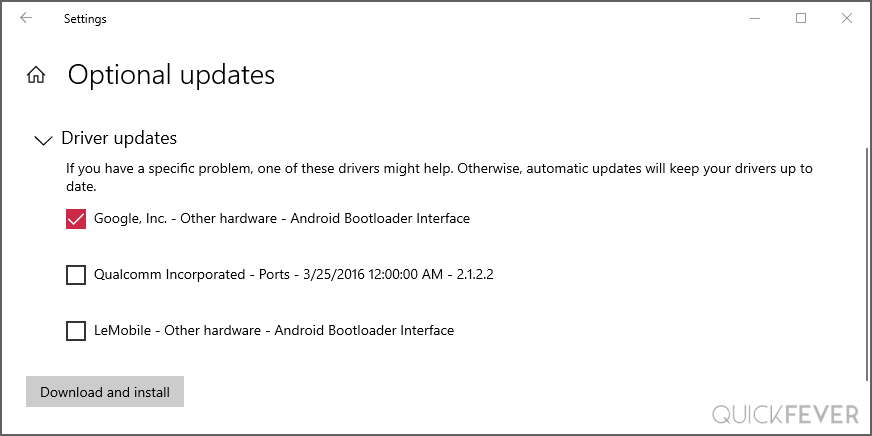
Starting with Windows version 20H2, Microsoft has quietly added it to Optional Updates. This means that you will have to go into the settings and install this software, which I am giving below in the steps and the steps are quite easy, you hardly need to face any problem in doing this from the office, for this you need an internet connection.
QUIckly open Windows settings and then Windows Updates (find under Update and security). Under the Check for update button you can see optional updates button right beneath it.
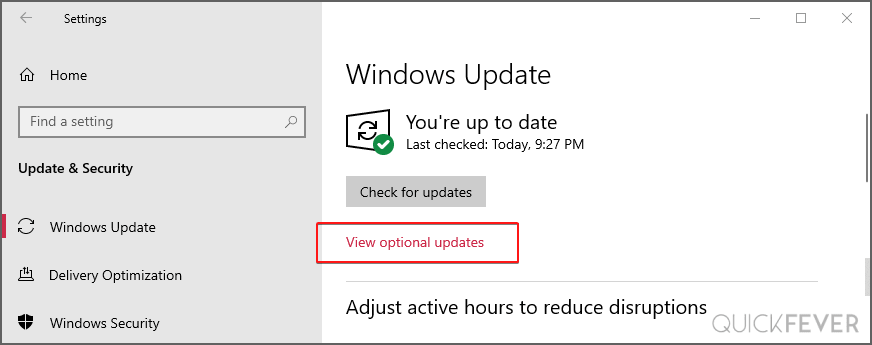
Now you have to click on the arrow icon. All optional updates will be shown here, select any update and download and install it. For this, you will need an internet connection. If you have a metered connection to your internet connection, then you can install such updates by coming here.
That’s it.
Manually Installing ADB and Fastboot Interface
Do this when ADB and fastboot commands are not working or your computer didn’t recognize devices when checking through ADB devices and fastboot devices command. This is a normal case with the recent version of Windows 10 and with some Oneplus devices.
prerequisite
- Disable driver signature enforcement: open a PowerShell window and enter
bcdedit /set testsigning on(and off when done). - Install Oneplus Driver, select Install this driver security prompt when asked.
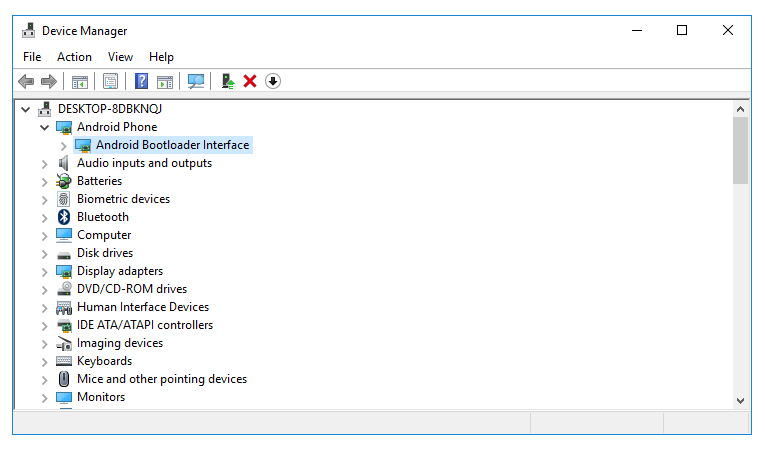
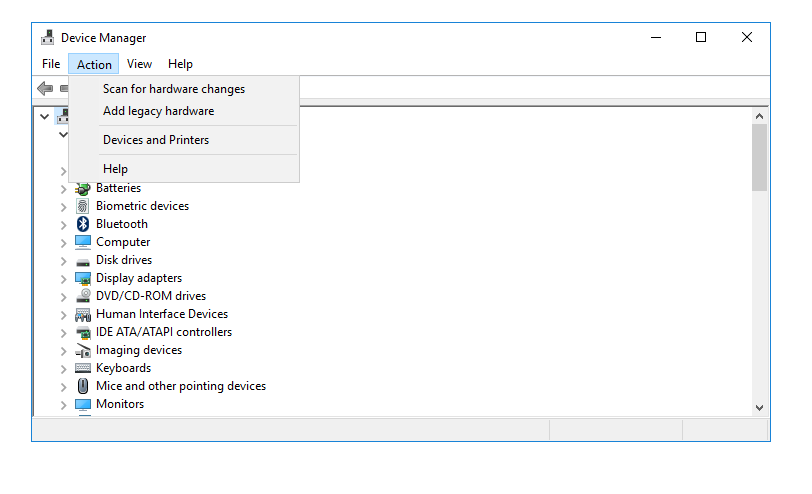
- Open device manager and look for Android Phone and Android Bootloader Interface if they show up somehow.
- From “Action” select Add legacy hardware.
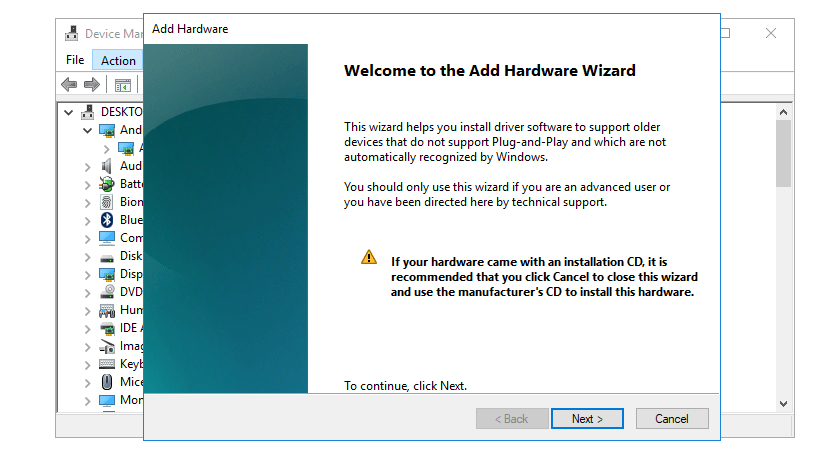
- Click Next.
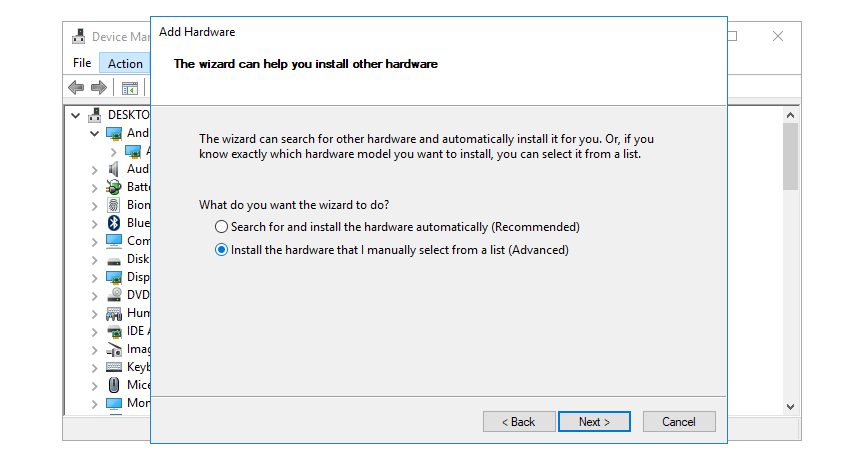
- Choose Install the hardware that I manually select from a list (Advanced).
- Select Android Phone.
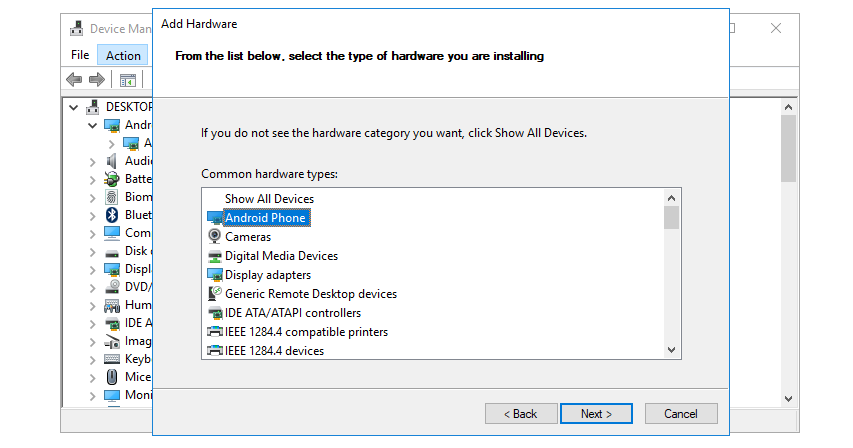
- Unless you’re connecting a device of other manufacturer such as Xiaomi device, Select Google, Inc. and choose Android Bootloader Interface. (Repeat the steps for Android ADB Interface).
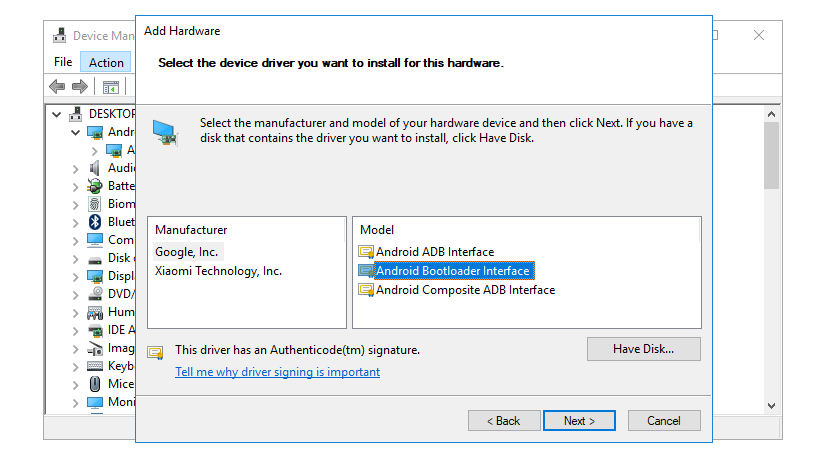
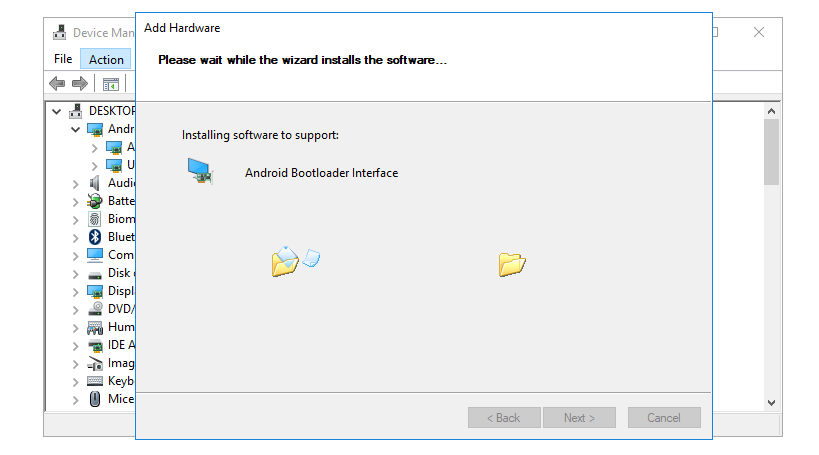
- The wizard will install the software, after that the ADB and Fastboot tools should work fine with your phone. remember not all of the phones are supported Fastboot, you should check your specific device.
That’s all for now if you think we missed something you can always drop a comment below.
For users who find this process time tacking, despite it shouldn’t take longer than 10 minutes. But instead, if you prefer installing ADB+fastboot in seconds, use a 3rd party installer like this one.