Microsoft recently added a brand new feature to Windows 11 called Screen Tint. If you spend long hours staring at your screen and Night Light alone isn’t cutting it for you, this is something worth trying. Screen Tint lets you apply a colored overlay across your entire display, and it goes way beyond what Night Light does with its simple warm tone. Think of it as a set of tinted glasses built right into your operating system.
Want a warmer and more comfortable display? Learn how to enable Screen Tint on Windows 11 and customize your screen colors in minutes.
What Exactly is Screen Tint?
Screen Tint is a new accessibility feature that sits under the Vision section in Windows 11 Settings. Unlike Night Light which only adjusts blue light levels, Screen Tint applies a full color overlay to your screen. Microsoft designed it for people who deal with things like migraines, photophobia (light sensitivity), reading fatigue, or just general discomfort from staring at a bright white display all day.
The feature comes with six built in color presets, and each one targets a specific kind of visual discomfort. You also get a strength slider to control how intense you want the tint to be.
Requirements
Before you go looking for this in your Settings, keep in mind that Screen Tint is currently available in Windows Insider Preview builds. You will need to be running one of the following builds or newer:
- Build 26300.8497 (Release Preview Channel)
- Build 26220.8680 (Beta Channel)
- Build 28020.2298 (Dev/Canary Channel)
If you are on a regular stable release of Windows 11, you might not see this option yet. Microsoft is gradually rolling it out and it should eventually land in a future stable update.
How to Enable Screen Tint
Here is how to turn it on:
- Open the Settings app. You can press Win + I on your keyboard to open it quickly.
- Click on Accessibility from the left sidebar.
- Under the Vision section, look for Screen tint and click on it.
- Toggle the switch to On.
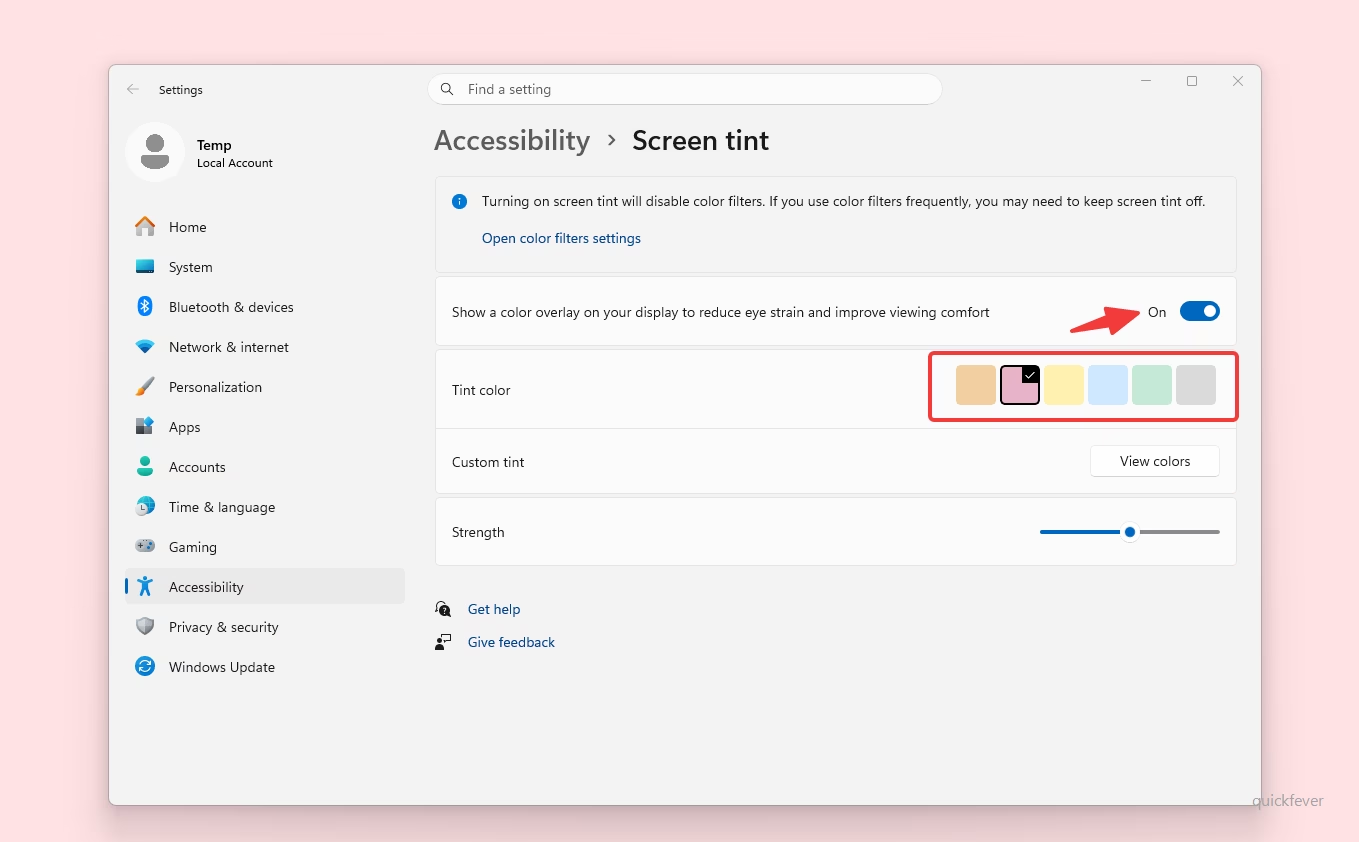
Once you turn it on, your screen will immediately get a subtle color overlay. By default it uses the Calm amber preset, but you can change that.
Available Color Presets
This is where it gets interesting. Microsoft didn’t just throw a single filter at you and call it a day. They gave you six carefully chosen presets, and each one is meant for a different scenario.
Calm amber works great for long screen sessions. If you are someone who sits in front of the computer for 8 to 10 hours a day, this one softens the harshness of white backgrounds without making everything look weird. It is like a warmer version of Night Light.
Rose tint is aimed at people who get migraines or feel uncomfortable under fluorescent lighting. Rose colored overlays have actually been used in clinical settings for a while now, and it is nice to see Microsoft baking this into the OS.
Soft yellow is designed for reading. If you find yourself squinting at long articles or documents and your eyes start feeling strained, the soft yellow preset reduces visual stress and makes text easier on the eyes.
Cool blue sounds counterintuitive since Night Light removes blue light, but this preset is actually useful in bright environments where glare is a problem. It helps balance out harsh sunlight coming through a window.
Gentle green is for people with photophobia or anyone who finds stark white backgrounds painful. Green tinted overlays are known to help with light sensitivity, and this preset does a good job of taking the edge off.
Natural grey is the most subtle option. If you find high contrast between black text and white backgrounds tiring, this preset reduces that contrast just enough to make things more comfortable without drastically changing how your screen looks.
Adjusting the Strength
Every preset comes with a Strength slider. You can drag it from a barely noticeable tint all the way up to a very prominent overlay. I would recommend starting low and gradually increasing it until you find what feels comfortable. Going too high right away might make your screen look unusually colored and that takes some getting used to.
Using a Custom Tint
If none of the six presets work for you, there is also an option to create your own custom tint. You can pick any color you want and apply it as an overlay. This is useful if you already know a specific color that helps with your particular visual needs.
Screen Tint vs Night Light vs Color Filters
This is a question that comes up often, so let me clear it up.
Night Light reduces blue light emission to help with sleep and general eye strain. It makes your screen warmer (more orange/yellow). It is a single purpose tool.
Color Filters is an accessibility feature designed primarily for people with color blindness. It changes how colors are displayed across the system using filters like Grayscale, Red Green, and Blue Yellow.
Screen Tint is the new one, and it applies a colored overlay without changing the underlying color representation. It is designed for visual comfort rather than color correction.
One important thing to note: Screen Tint and Color Filters cannot be used at the same time. Enabling one will automatically disable the other. However, you can use Screen Tint and Night Light together without any issues. So if you want warm tones from Night Light plus a gentle green overlay from Screen Tint, go for it.
Quick Toggle with Keyboard Shortcut
As of the current Insider builds, there is no dedicated keyboard shortcut for Screen Tint like the Win + Ctrl + C shortcut that exists for Color Filters. You will have to go into Settings each time to toggle it. That said, you can pin the Accessibility settings page to your Start menu for quicker access. Microsoft may add a keyboard shortcut in a future update.
Does Screen Tint Affect Screenshots?
No. Screen Tint is a display level overlay, meaning it only affects what you see on your monitor. If you take a screenshot or record your screen, the tint will not show up in the captured image. Same goes for presentations or screen sharing, the other person will see your normal screen colors.
Worth Trying If You Have Eye Strain Issues
I have been using the Calm amber preset for about a week now and honestly it makes a noticeable difference during late night work sessions. Combined with Night Light, it creates a much more comfortable viewing experience compared to using either feature alone.
If you deal with any kind of light sensitivity, migraines, or just find yourself rubbing your eyes a lot after long screen time, give Screen Tint a try once it becomes available on your build. It is one of those features that you don’t think you need until you actually try it.
I hope you found this article helpful. If you have any questions about Screen Tint or anything else Windows 11 related, drop a comment below and I will try to help you out.