This article depicts how you can install Windows 11 on a Legacy BIOS where the system does not support secure boot and TPM or have them disabled. The solution given in this article works 100%, and there are multiple ways to bypass the “this PC cannot run Windows 11” error message.
The moment a new operating system version is released, you can’t wait to get it installed, even though you’ve done it many times before. Hence, in such a situation, you know what kind of problems to expect and what steps to take.
but when you come across an error in installing the operating system, your excitement level drops drastically, similar to what has been seen in a leaked version of Windows 11, in which it displays the requirements of TPM 2.0 and secure boot.
If you’re running a UEFI-based system with a secure boot and TPM 2.0 feature, you can enable these features very easily and most computers are compatible with them.
important: The question of TPM 2.0 is a required feature to install Windows 11 has also been hotly debated, so if you are a user with a Legacy BIOS system and want to install Windows 11 on your computer we got you covered.
also important: The leaked build made one thing clear, that specific build requires your system with TPM 2.0 support which is uncommon for Windows operating system builds.
first, let’s discuss what is the requirement
- Windows 11 ISO system image file
- Windows 10 ISO system file
- A computer running on Windows 10 or 11
- A USB flash drive with at least 8 GB of space
Windows 11 installation without TPM 2.0 or secure boot on legacy BIOS systems
Once you have all the above-mentioned requirements, installing Windows 10 on a Legacy Bios system is quite straightforward.
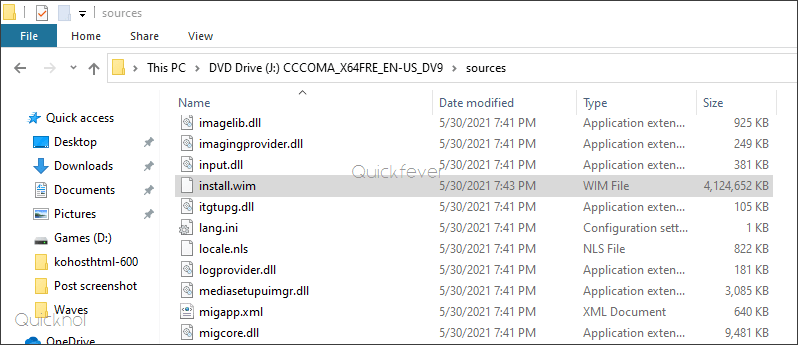
so what is the solution? When you create a bootable USB drive of Windows 10, an install.wim file is created inside the source folder. What we are going to do is replace this file with Windows 11’s install.wim from the source folder.
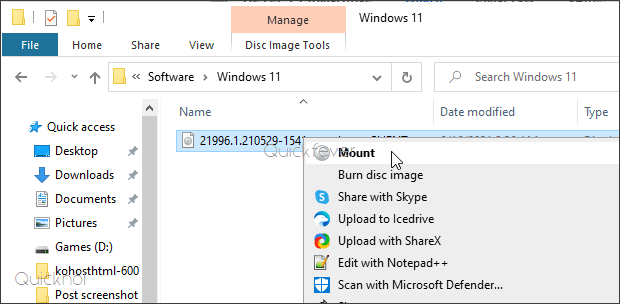
Step 1. Select Windows 10 ISO system image file, and right-click on it. You can then access all the files inside the system image by choosing the Mount option. The Mount option will enable you to access the files in the system image.
Locate the install.wim file located inside the sources folder. Do the same with Windows 11 ISO, take out the Windows 11 install.wim and paste it to Windows 10 ISO folder.
Also if you created a Windows 10 bootable USB you just need to copy Windows 11 install.wim and it will work out of the box.
What exactly did we do will be explained in this section.
This will not interfere with the booting process of the Windows 10 USB drive, all the files which are responsible for the operating system are located inside the install.wim folder. All the files that are necessary for Windows 10 to boot from a USB drive are contained in the install.wim folder, which will not interfere with the boot process. Since we swapped Windows 10’s file with Windows 11, your USB drive will boot Windows 11.
Upon completion of the above steps, turn off your computer, and when it starts up, press the boot device selection key. You will be led through the installation of Windows 11 by following all the instructions on the screen. this will automatically bypass all the secure boot and TPM 2.0 requirements. It can be a little confusing as Legacy BIOS supports MBR partition ( the one we see on standard hard disk).
Having UEFI and getting This PC can’t run Windows 11.
There are thousands of people who are trying to install Windows 10 on a UEFI system but getting ahead by this PC cannot run Windows 11. The workaround described here can be used to install Windows 11 on either a UEFI or Legacy BIOS system.
- Create a Windows 11 bootable USB.
- Making a copy of appraiserres.dll from the ‘sources’ folder of Windows 10 ISO, and pasting it to ‘sources’ folder of Windows 11 ISO.
- This solution is for clean installation.
6 comments
so are you saying to change the win11 install.wim with the win10 install.wim so i would go into the win11 iso and paste the win10 install.wim inside that folder? so the win11 iso will now have the win 10 install.wim in it instead? if so can i rename that win11 file to install.wim1 so i do not ose it?
so by doing this i get all the win 11 OS with the win10 istallation so it tricks the computers need to have uefi and tpm 2.0? thanks
====
ok i downloaded win11 english_x64 and i did a search for 11 install.wim and i did not find it in that file. i got that iso from microsoft. so did i get the wrong iso. in the download it calls it a disk image file. i mounted that file and looked in every folder and that name is not there.
so if i need a different win11 iso can you link me to the iso files. i tried to do what tomsguide website said to install win11 but that is not working either.
maybe i will jsut get a used pc from ebay with win 11 on it. i have the linux winfx and that will not install because it is looking for the tpm and uefi my pc has neither. thanks bob p
=====
ok i’m working this and tell me when i do step 3 and click create iso do i put that on my hard drive or on a stick? this time i put it on a stick and then i see i have to use rukus and when i do that it will erase the thumd and then i will not have the iso. so it kind ot looks lik ei have to put that step 3 iso file on my pc maybe a folder and then let it do it’s thing. i just afraid it will want to erase my hard drive. i got a message when i started putting the iso on the stick that is would erase the stick. or do i put in a second thumb and have rukus find the iso and them put it on the 2nd thumb?
====
ok sorry this is what i’m doing now tell me if it is wrong!
i put the iso file on the usb card and then when it finished i took it out and put in into the test pc. i booted the test pd to the usb card. it started installing windows and it looks like it might be win11 as it doesn’t look like win10. i did see a window pop up when i was doing that iso the had some bypass info it on the first pc. and then that went away when the iso finished writing to the usb card.
so i then put that usb card into the test pc and it asked me about the hard drive so i let it do it’s think there. then it started installing with a white screen.
it is doing the install like win10 but a bit different. so tell me will i have all the security like win10? like defender and such or because it is bypassing secure boot and tpm i will lose the security stuff and have to get an antivirus program? at this time on my regular pc i have malware bytes ccleaner also and google has some security things as well
or can i go into the security folder and tell it to not allow things like ransomware etc?
win11 did show up
thanks bob p.
=========
ok devendra. this is what i did. i got as far as putting win11 iso on a stick, i did not do rufus and i put that stick into the test pc and win11 installed. i went and checked and i have defender and the firewalls are on. also i was able to go and turn on folder security that you talk about. so i think it is going. i did not us rufus at all. i got to step 6 in your instructions. then i took the stick and put it in the test pc and boot to the usb stick and win11 installed. it is running and i’m making changes to get it a bit more like win10.
i do not like the right click that makes me go to the bottom and click again for copy and paste. and i’m going to try and get the win7 menu like the classic shell. i see it is available. thanks.
i’m going to get another hard drive and try this same procedure on my other 2 pcs and see if it works the same way. if you want me to let you know how that goes let me know to inform you.
thanks bob p.
sorry i bothered you so late. no need to reply if it is late or your busy.
====
usa in michigan. you might try doing what i did.to see if it works for you. i did not have to us rufus to reburn. i got to step 4 and it downloaded win11 to the stick then it did step 6 and also a window open that ran some comand that took tpm uefi and some other stuff out and then that stopped and it kept installing to the stick. when if finished that window closed and then command opened and had 2 likes the last ended in corva. and then it was done. i ejected the stick and put it into the test ps and booted to that stick and it did just about like win10 does it looked about the same wanted to go to step 2 for configuring the hard drive and it did what it needed then it started installing win11. i could tell it was doing something different as the screen was white, anyway it took about an hour on that test pc. then it started and i had to make personal changes and i used it last night, still need to make personal changes but hey thanks for those instructions your are the only one that has it so easy. you might want to add a caveat that says step 6 may be plenty. i did about 10 reboots so far and i haven’t had any issues.
like i said i’m going to get 2 more drives and install them into 2 more pcs and seeif your instruction work for them. i will let you know how that goes.
again thanks much for helping bob p.
You need to copy the Windows 11 install.wim to Windows 10 install.wim So the Windows 10 ISO will work as Windows 11. If you do this your PC won’t be asking this permission.
il file install.wim non esiste, ma al suo posto c’è install.esd o boot.wim,
Comunque sia pure modificando questi file o solo istall.esd (che sembrerebbe sostituire il vecchio install.wim) la storia non cambia, il pc richiede sempre il secure boot
Translate: the install.wim file does not exist, but instead there is install.esd or boot.wim,
However, even if you modify these files or just istall.esd (which would seem to replace the old install.wim) the story does not change, the pc always requires secure boot
Okey, Create a Windows 10 and Windows 11 ISO using our guide which creates ISO with install.wim, then follow this guide.
i installed right over Windows 8
legacy system p5qturbo quad 9450 very old
was easy no need to make bootable
Thank you <3