Windows 11 is a solid operating system with faster boot times, a cleaner design, and better gaming performance. But Microsoft has also turned it into an advertising billboard. From the Start Menu to the Lock Screen, from File Explorer banners to full-screen “Finish Setting Up” nag screens, ads are baked into almost every corner of the OS.
The good news? Every single one of them can be turned off.
Note: Some of these settings may vary slightly depending on your Windows 11 edition (Home, Pro, Enterprise) and update version. All steps have been verified on Windows 11 25H2.
Disable Windows 11 Advertising
After our popular How to Disable Windows 10 Built-in Advertising Completely guide, this guide covers every known advertising surface in Windows 11 (updated for the 24H2 release) and shows you exactly how to disable each one. Whether you prefer clicking through Settings or going nuclear with the Registry Editor, we’ve got you covered.
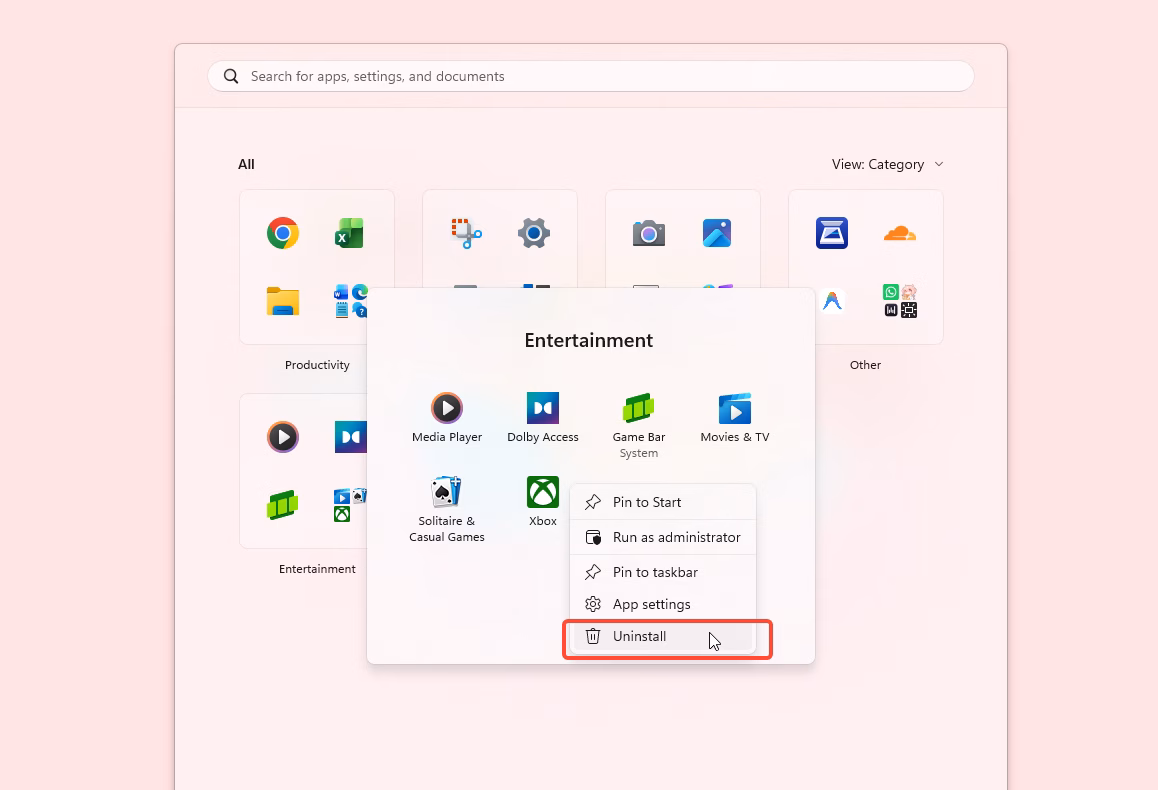
1. Remove Auto-Installed Bloatware Apps
Windows 11 comes pre-loaded with apps you never asked for: Spotify, Disney+, TikTok, Instagram, Clipchamp, and more. Some are installed during the initial setup, others appear silently later.
How to remove them:
- Open the Start Menu
- Right-click any unwanted app
- Click Uninstall
For apps that don’t appear in the Start Menu, go to Settings → Apps → Installed apps, find the offending app, click the three-dot menu (⋯), and hit Uninstall.
Tip: Don’t just unpin them. Actually uninstall. Unpinning hides the shortcut but the app stays installed and can still run in the background.
2. Stop Start Menu Recommendations and Ads
The “Recommended” section at the bottom of the Start Menu is arguably Windows 11’s most annoying ad surface. It shows apps you’ve never installed and, as of 24H2, even account-related promotional notifications with a badge on your profile icon.
How to disable:
- Go to Settings → Personalization → Start
- Turn off these toggles:
- “Show recommendations for tips, shortcuts, new apps, and more”
- “Show account-related notifications occasionally in Start” (new in 24H2)
- “Show recently added apps” (optional, but reduces clutter)
- Under Layout, select “More pins” to minimize the Recommended section’s footprint.
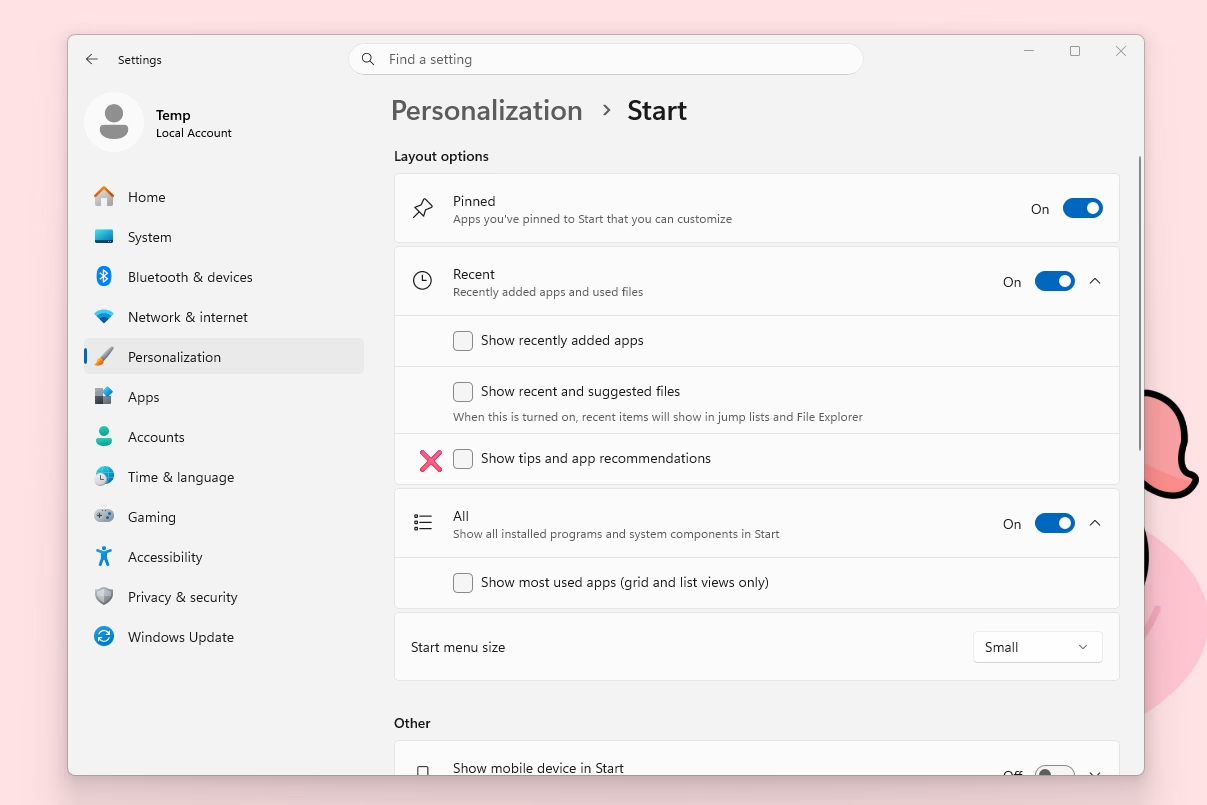
The Recommended section won’t disappear entirely (it’ll still show your recent files), but the ads will stop.
Registry (for the persistent):
HKEYCURRENTUSER\Software\Microsoft\Windows\CurrentVersion\Explorer\Advanced
Set StartIrisRecommendations to 0 (DWORD)
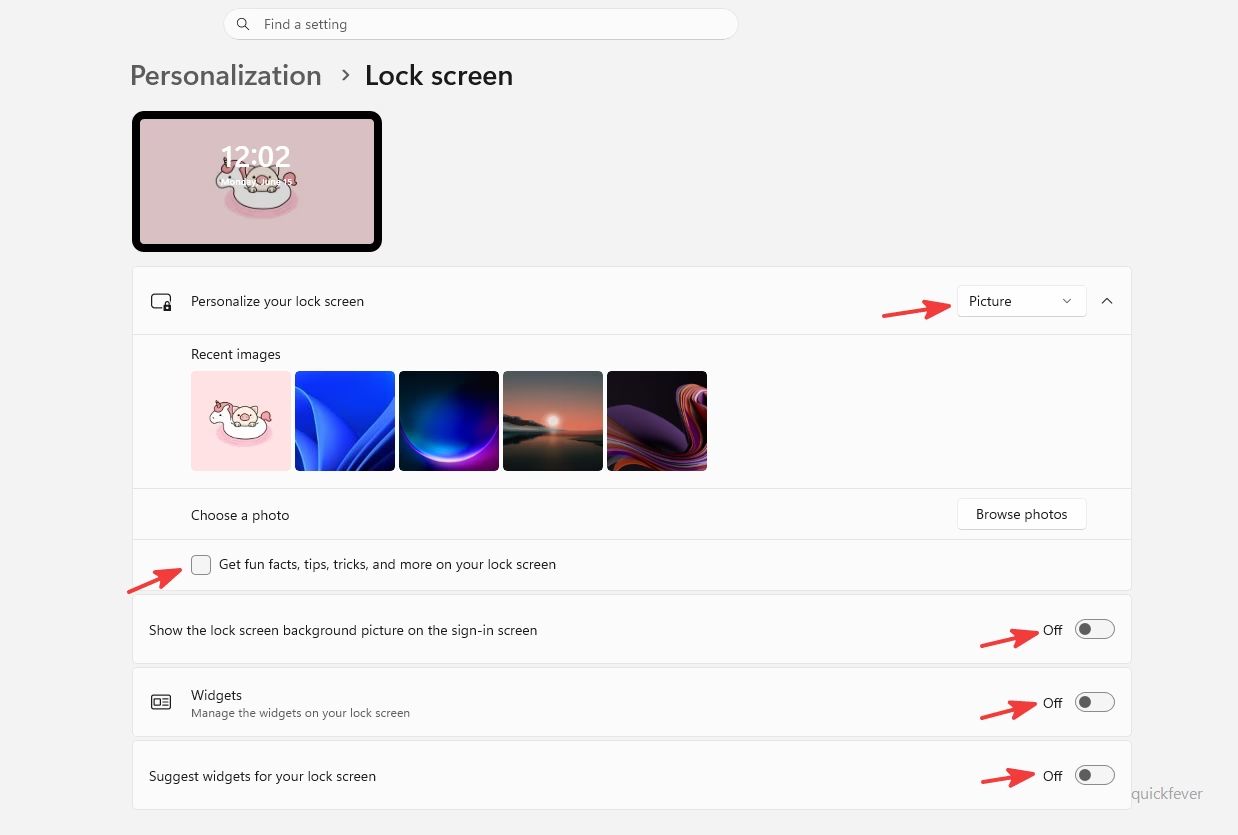
3. Disable Lock Screen Ads (Windows Spotlight)
Windows Spotlight gives you gorgeous daily wallpapers on the lock screen, but comes with a catch: “fun facts, tips, and tricks” that are essentially advertisements for Bing, Microsoft Edge, and partner products.
Related: Best Windows 11 Live Wallpapers and Animated Wallpapers handpicked
How to disable:
Option A: Keep Spotlight wallpapers, remove the ads
- Go to Settings → Personalization → Lock screen
- Uncheck “Get fun facts, tips, tricks, and more on your lock screen”
Option B: Ditch Spotlight entirely
- Same path: Settings → Personalization → Lock screen
- Change “Personalize your lock screen” from Windows Spotlight to Picture or Slideshow
4. Turn Off Desktop Spotlight Promotions
New in Windows 11 (this didn’t exist in Windows 10): Microsoft brought Spotlight to the desktop wallpaper too. Beautiful photos, but with a hovering icon that promotes Bing searches and Microsoft content.
How to disable:
- Right-click on the desktop → Personalize
- Click Background
- Change “Personalize your background” from Windows Spotlight to Picture, Solid color, or Slideshow
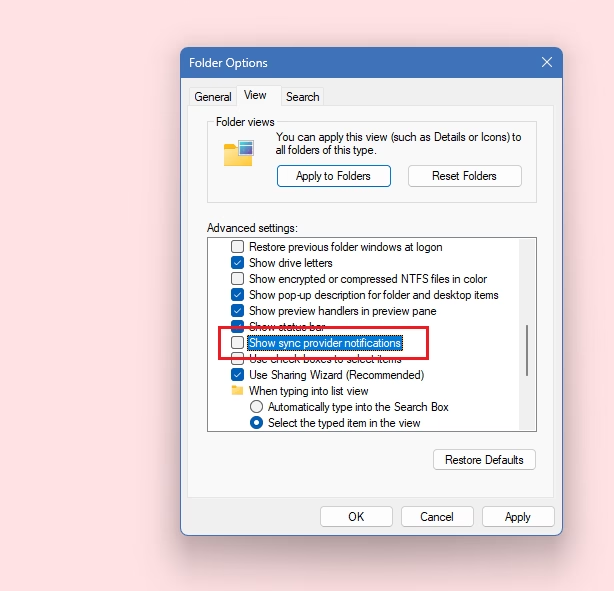
5. Kill File Explorer Ads (OneDrive & Microsoft 365)
Open File Explorer and you might see a banner at the top promoting OneDrive backup or Microsoft 365. Yes, Microsoft puts ads in your file manager.
How to disable:
- Open File Explorer
- Click the three-dot menu (⋯) in the toolbar → Options
- Go to the View tab
- Uncheck “Show sync provider notifications”
- Click Apply, then OK
That’s it. No more banner ads in File Explorer.
Disable Notification Ads and Tips
Windows 11 sends toast notifications with “tips,” “suggestions,” and feature promotions. These are ads wearing a helpful disguise.
How to disable:
- Go to Settings → System → Notifications
- Scroll down to “Additional settings” (expand it if collapsed)
- Uncheck all three:
- “Show the Windows welcome experience after updates and occasionally when I sign in to highlight what’s new and suggested”
- “Suggest ways to get the most out of Windows and finish setting up this device”
- “Get tips and suggestions when using Windows”
While you’re here, you can also turn off notifications from specific apps like Microsoft Store, Windows Backup, and Xbox by toggling them off in the notification list above.
Shut Down the “Finish Setting Up” Nag Screen
This is the one that makes people want to throw their laptop. Periodically, Windows 11 hijacks your entire screen with a “Let’s finish setting up your device” wizard that pushes OneDrive, Microsoft 365, Game Pass, phone linking, and more.
How to disable:
This is controlled by the same setting from Section 6:
- Go to Settings → System → Notifications → Additional settings
- Uncheck “Suggest ways to get the most out of Windows and finish setting up this device”
You should never see that nag screen again.
Remove Widgets Panel (MSN News Feed Ads)
The Widgets panel (accessible from the taskbar) is a news feed powered by MSN. The content is a mix of clickbait headlines and sponsored posts, basically a built-in ad feed.
How to disable:
- Right-click the Taskbar
- Click Taskbar settings
- Turn off Widgets
Alternatively, right-click the Widgets icon on the taskbar and select “Hide from taskbar”.
Disable Search Highlights and Bing Web Results
Click the search box on the taskbar and you’ll see “search highlights” showing trending topics, daily facts, and Bing-powered web results. None of this helps you find files on your PC.
How to disable search highlights:
- Go to Settings → Privacy & security → Search permissions
- Scroll down to “More settings”
- Turn off “Show search highlights”
How to disable web results entirely (Registry):
- Open Registry Editor (Win + R → regedit)
- Navigate to: HKEYCURRENTUSER\SOFTWARE\Policies\Microsoft\Windows\Explorer
(If Explorer doesn’t exist, right-click Windows → New → Key → name it Explorer) - Right-click → New → DWORD (32-bit) Value → Name it DisableSearchBoxSuggestions
- Set value to 1
- Restart your PC
Now search will only show local results: files, apps, and settings on your computer.
Tame Microsoft Edge’s Ad Blitz
Even if you use Edge as your primary browser, its ad load is intense. New tab page promotions, shopping notifications, Bing pop-ups, and constant nagging if you try to switch to another browser.
Disable new tab page ads:
- Open Edge → Open a new tab
- Click the gear icon (⚙️) on the new tab page
- Set “Content” to “Content off” or customize to disable sponsored links
Disable shopping features:
- Edge Settings → Privacy, search, and services
- Scroll to “Services” and turn off:
- “Show opportunities to save money while shopping in Microsoft Edge”
- “Get notifications of related things you can explore with Discover”
Stop Edge from running in the background:
- Edge Settings → System and performance
- Turn off “Startup boost”
- Turn off “Continue running background extensions and apps when Microsoft Edge is closed”
Stop Edge from nagging when you change default browser:
Ignoring the pop-ups works, but you can also kill the nag via Registry:
HKEYLOCALMACHINE\SOFTWARE\Policies\Microsoft\Edge
Set DefaultBrowserSettingEnabled to 0 (DWORD)
This prevents Edge from repeatedly asking to be set as the default browser.
Remove or Hide Copilot
Microsoft’s AI assistant Copilot appeared in 23H2 and became more prominent in 24H2. It gets a taskbar button and occasional promotional prompts.
Hide from taskbar:
- Right-click the Taskbar → Taskbar settings
- Turn off Copilot (it may appear as a pinned app in newer builds, just right-click and Unpin)
Disable entirely via Registry (all editions):
- Open Registry Editor
- Navigate to: HKEYCURRENTUSER\Software\Policies\Microsoft\Windows\WindowsCopilot
(Create the WindowsCopilot key if it doesn’t exist) - New → DWORD (32-bit) Value → Name: TurnOffWindowsCopilot → Value: 1
- Restart your PC
Disable via Group Policy (Pro/Enterprise only):
- Open gpedit.msc
- Navigate to: User Configuration → Administrative Templates → Windows Components → Windows Copilot
- Enable “Turn off Windows Copilot”
- Stop OneDrive Nagging
OneDrive auto-starts, auto-signs-in, nags you to back up your Desktop/Documents/Pictures folders, warns you about storage limits, and won’t easily leave you alone.
Reduce the nagging:
- Click the OneDrive cloud icon in the system tray → ⚙️ Settings
- Under Notifications, uncheck all promotional notification options
- Under Sync and backup, unselect any folders you don’t want backed up
Stop OneDrive from auto-starting:
- Open Task Manager (Ctrl + Shift + Esc)
- Go to Startup apps
- Find Microsoft OneDrive → Right-click → Disable
Fully uninstall OneDrive:
- Go to Settings → Apps → Installed apps
- Find Microsoft OneDrive
- Click ⋯ → Uninstall
Warning: Uninstalling OneDrive will remove the OneDrive integration from File Explorer. If you actively use OneDrive for file syncing, just disable the notifications instead.
- Turn Off Personalized Ad Tracking
Windows assigns every user a unique Advertising ID that tracks your activity and serves personalized ads across Microsoft apps and third-party apps from the Store.
How to disable:
- Go to Settings → Privacy & security → General
- Turn off all four toggles:
- “Let apps show me personalized ads by using my advertising ID”
- “Let websites show me locally relevant content by accessing my language list”
- “Let Windows improve Start and search results by tracking app launches”
- “Show me suggested content in the Settings app”
This resets your advertising ID and prevents new tracking.
- Disable Tailored Experiences (Telemetry-Based Ads)
Microsoft uses diagnostic data (telemetry) to serve “tailored experiences”, which is just a polished way of saying personalized ads and product suggestions.
How to disable:
- Go to Settings → Privacy & security → Diagnostics & feedback
- Turn off “Send optional diagnostic data” (set to Required only)
- Expand “Tailored experiences” and turn it Off
- Turn off “Improve inking and typing”
- Set “Feedback frequency” to Never
- Disable Settings App & Device Usage Suggestions
The Settings app shows inline recommendations and banners promoting Microsoft services as you browse. There’s also a sneaky Device Usage page that tailors suggestions based on what you tell Windows you use your PC for.
Disable Settings suggestions:
- Go to Settings → Privacy & security → General
- Turn off “Show me suggested content in the Settings app”
(This toggle is the same one from Section 13. If you’ve already done that step, you’re covered.)
Disable Device Usage profiling:
- Go to Settings → Personalization → Device usage
- Turn OFF all categories: Gaming, Family, Creativity, School, Entertainment, Business
When these are enabled, Windows uses them to push targeted suggestions. You’ll get Game Pass ads if you checked “Gaming,” Microsoft 365 ads if you checked “Business,” and so on. Turn them all off.
- Quiet the Xbox Game Bar Promotions
The Xbox Game Bar shows Game Pass promotions and suggested games even if you’re not a subscriber.
How to disable:
- Go to Settings → Gaming → Xbox Game Bar
- Turn off “Open Xbox Game Bar using this button on a controller”
If you don’t game on PC at all, you can leave the Game Bar off entirely. This won’t affect Game Mode for performance since that’s a separate setting.
- Prevent Future Silent App Installs (Registry)
This is the big one. Even after you uninstall bloatware, Windows 11 can silently reinstall apps in the background. The only way to prevent this permanently is through the Registry.
How to disable:
- Open Registry Editor (Win + R → regedit)
- Navigate to: HKEYCURRENTUSER\Software\Microsoft\Windows\CurrentVersion\ContentDeliveryManager
- Find and set the following values to 0 (double-click each → change Value data to 0):
- SilentInstalledAppsEnabled → 0
- ContentDeliveryAllowed → 0
- OemPreInstalledAppsEnabled → 0
- PreInstalledAppsEnabled → 0
- PreInstalledAppsEverEnabled → 0
- SubscribedContent-338387Enabled → 0
- SubscribedContent-338388Enabled → 0
- SubscribedContent-338389Enabled → 0
- SubscribedContent-338393Enabled → 0
Tip: If any of these values don’t exist, right-click in the right pane → New → DWORD (32-bit) Value and create them.
- The Nuclear Option: One Registry File to Disable Everything
Don’t want to click through 20 settings pages? Save the following as a .reg file and double-click to import it. This disables virtually all advertising surfaces in one shot.
reg
Windows Registry Editor Version 5.00
; === Disable Content Delivery & Silent App Installs ===
[HKEYCURRENTUSER\Software\Microsoft\Windows\CurrentVersion\ContentDeliveryManager]
“ContentDeliveryAllowed”=dword:00000000
“OemPreInstalledAppsEnabled”=dword:00000000
“PreInstalledAppsEnabled”=dword:00000000
“PreInstalledAppsEverEnabled”=dword:00000000
“SilentInstalledAppsEnabled”=dword:00000000
“SoftLandingEnabled”=dword:00000000
“SubscribedContent-310093Enabled”=dword:00000000
“SubscribedContent-314563Enabled”=dword:00000000
“SubscribedContent-338387Enabled”=dword:00000000
“SubscribedContent-338388Enabled”=dword:00000000
“SubscribedContent-338389Enabled”=dword:00000000
“SubscribedContent-338393Enabled”=dword:00000000
“SubscribedContent-353694Enabled”=dword:00000000
“SubscribedContent-353696Enabled”=dword:00000000
“SubscribedContent-353698Enabled”=dword:00000000
“SystemPaneSuggestionsEnabled”=dword:00000000
“RotatingLockScreenEnabled”=dword:00000000
“RotatingLockScreenOverlayEnabled”=dword:00000000
; === Disable Start Menu Recommendations ===
[HKEYCURRENTUSER\Software\Microsoft\Windows\CurrentVersion\Explorer\Advanced]
“StartIrisRecommendations”=dword:00000000
“ShowSyncProviderNotifications”=dword:00000000
; === Disable “Finish Setting Up” Nag ===
[HKEYCURRENTUSER\SOFTWARE\Microsoft\Windows\CurrentVersion\UserProfileEngagement]
“ScoobeSystemSettingEnabled”=dword:00000000
; === Disable Advertising ID ===
[HKEYCURRENTUSER\Software\Microsoft\Windows\CurrentVersion\AdvertisingInfo]
“Enabled”=dword:00000000
; === Disable Windows Consumer Features ===
[HKEYCURRENTUSER\SOFTWARE\Policies\Microsoft\Windows\CloudContent]
“DisableWindowsConsumerFeatures”=dword:00000001
“DisableTailoredExperiencesWithDiagnosticData”=dword:00000001
[HKEYLOCALMACHINE\SOFTWARE\Policies\Microsoft\Windows\CloudContent]
“DisableWindowsConsumerFeatures”=dword:00000001
“DisableSoftLanding”=dword:00000001
“DisableCloudOptimizedContent”=dword:00000001
; === Disable Bing Search in Start Menu ===
[HKEYCURRENTUSER\SOFTWARE\Policies\Microsoft\Windows\Explorer]
“DisableSearchBoxSuggestions”=dword:00000001
; === Disable Edge Default Browser Nagging ===
[HKEYLOCALMACHINE\SOFTWARE\Policies\Microsoft\Edge]
“DefaultBrowserSettingEnabled”=dword:00000000
; === Disable Copilot ===
[HKEYCURRENTUSER\Software\Policies\Microsoft\Windows\WindowsCopilot]
“TurnOffWindowsCopilot”=dword:00000001
; === Disable Widgets ===
[HKEYLOCALMACHINE\SOFTWARE\Policies\Microsoft\Dsh]
“AllowNewsAndInterests”=dword:00000000
How to use:
- Open Notepad
- Paste the entire block above
- Save as disable-windows11-ads.reg (make sure “Save as type” is set to All Files, not Text)
- Double-click the file → Click Yes when prompted
- Restart your PC
⚠️ Caution: Editing the registry incorrectly can cause system issues. We recommend creating a System Restore point before importing. Go to System Properties → System Protection → Create to make one.
- PowerShell Script to Remove Bloatware
Want to mass-uninstall those pre-installed apps? Open PowerShell as Administrator and run:
powershell
Remove common bloatware (customize this list as needed)
$bloatware = @(
“Microsoft.BingNews”
“Microsoft.BingWeather”
“Microsoft.GamingApp”
“Microsoft.GetHelp”
“Microsoft.Getstarted”
“Microsoft.MicrosoftSolitaireCollection”
“Microsoft.People”
“Microsoft.PowerAutomateDesktop”
“Microsoft.Todos”
“Microsoft.WindowsAlarms”
“Microsoft.WindowsFeedbackHub”
“Microsoft.WindowsMaps”
“Microsoft.WindowsSoundRecorder”
“Microsoft.Xbox.TCUI”
“Microsoft.XboxGameOverlay”
“Microsoft.XboxGamingOverlay”
“Microsoft.XboxIdentityProvider”
“Microsoft.XboxSpeechToTextOverlay”
“Microsoft.YourPhone”
“Microsoft.ZuneMusic”
“Microsoft.ZuneVideo”
“Clipchamp.Clipchamp”
“Disney.37853FC22B2CE”
“SpotifyAB.SpotifyMusic”
“BytedancePte.Ltd.TikTok”
“Facebook.Instagram”
)
foreach ($app in $bloatware) {
Get-AppxPackage -Name $app -AllUsers | Remove-AppxPackage -AllUsers -ErrorAction SilentlyContinue
Get-AppxProvisionedPackage -Online | Where-Object DisplayName -Like $app | Remove-AppxProvisionedPackage -Online -ErrorAction SilentlyContinue
Write-Host “Removed: $app” -ForegroundColor Green
}
Write-Host “nDone! Bloatware removed.” -ForegroundColor Cyan
Note: The Remove-AppxProvisionedPackage line prevents these apps from coming back when you create new user accounts. Remove any apps from the list that you actually want to keep.
- PowerShell Master Script: Disable All Ads at Once
This is the all-in-one PowerShell script that applies every Registry tweak from this guide in one go. Run it as Administrator:
powershell
Windows 11 – Disable ALL Ads & Suggestions
Run in elevated PowerShell (Admin)
Write-Host “Disabling Windows 11 advertising…” -ForegroundColor Cyan
— ContentDeliveryManager (the big one) —
$cdm = “HKCU:\Software\Microsoft\Windows\CurrentVersion\ContentDeliveryManager”
@{
“ContentDeliveryAllowed” = 0
“OemPreInstalledAppsEnabled” = 0
“PreInstalledAppsEnabled” = 0
“PreInstalledAppsEverEnabled” = 0
“SilentInstalledAppsEnabled” = 0
“SoftLandingEnabled” = 0
“SubscribedContent-310093Enabled” = 0
“SubscribedContent-314563Enabled” = 0
“SubscribedContent-338387Enabled” = 0
“SubscribedContent-338388Enabled” = 0
“SubscribedContent-338389Enabled” = 0
“SubscribedContent-338393Enabled” = 0
“SubscribedContent-353694Enabled” = 0
“SubscribedContent-353696Enabled” = 0
“SubscribedContent-353698Enabled” = 0
“SystemPaneSuggestionsEnabled” = 0
“RotatingLockScreenEnabled” = 0
“RotatingLockScreenOverlayEnabled” = 0
}.GetEnumerator() | ForEach-Object {
Set-ItemProperty -Path $cdm -Name $.Key -Value $.Value -Type DWord -ErrorAction SilentlyContinue
}
Write-Host ” [OK] ContentDeliveryManager” -ForegroundColor Green
— Start Menu & File Explorer —
$explorer = “HKCU:\Software\Microsoft\Windows\CurrentVersion\Explorer\Advanced”
Set-ItemProperty -Path $explorer -Name “StartIrisRecommendations” -Value 0 -Type DWord
Set-ItemProperty -Path $explorer -Name “ShowSyncProviderNotifications” -Value 0 -Type DWord
Write-Host ” [OK] Start Menu & File Explorer ads” -ForegroundColor Green
— “Finish Setting Up” nag —
$upe = “HKCU:\SOFTWARE\Microsoft\Windows\CurrentVersion\UserProfileEngagement”
if (!(Test-Path $upe)) { New-Item -Path $upe -Force | Out-Null }
Set-ItemProperty -Path $upe -Name “ScoobeSystemSettingEnabled” -Value 0 -Type DWord
Write-Host ” [OK] ‘Finish Setting Up’ nag” -ForegroundColor Green
— Advertising ID —
$adInfo = “HKCU:\Software\Microsoft\Windows\CurrentVersion\AdvertisingInfo”
Set-ItemProperty -Path $adInfo -Name “Enabled” -Value 0 -Type DWord
Write-Host ” [OK] Advertising ID” -ForegroundColor Green
— Cloud Content / Consumer Features —
$cloud = “HKLM:\SOFTWARE\Policies\Microsoft\Windows\CloudContent”
if (!(Test-Path $cloud)) { New-Item -Path $cloud -Force | Out-Null }
Set-ItemProperty -Path $cloud -Name “DisableWindowsConsumerFeatures” -Value 1 -Type DWord
Set-ItemProperty -Path $cloud -Name “DisableSoftLanding” -Value 1 -Type DWord
Set-ItemProperty -Path $cloud -Name “DisableCloudOptimizedContent” -Value 1 -Type DWord
Write-Host ” [OK] Cloud content / consumer features” -ForegroundColor Green
— Bing Search in Start —
$search = “HKCU:\Software\Policies\Microsoft\Windows\Explorer”
if (!(Test-Path $search)) { New-Item -Path $search -Force | Out-Null }
Set-ItemProperty -Path $search -Name “DisableSearchBoxSuggestions” -Value 1 -Type DWord
Write-Host ” [OK] Bing search suggestions” -ForegroundColor Green
— Edge default browser nag —
$edge = “HKLM:\SOFTWARE\Policies\Microsoft\Edge”
if (!(Test-Path $edge)) { New-Item -Path $edge -Force | Out-Null }
Set-ItemProperty -Path $edge -Name “DefaultBrowserSettingEnabled” -Value 0 -Type DWord
Write-Host ” [OK] Edge default browser nag” -ForegroundColor Green
— Copilot —
$copilot = “HKCU:\Software\Policies\Microsoft\Windows\WindowsCopilot”
if (!(Test-Path $copilot)) { New-Item -Path $copilot -Force | Out-Null }
Set-ItemProperty -Path $copilot -Name “TurnOffWindowsCopilot” -Value 1 -Type DWord
Write-Host ” [OK] Copilot” -ForegroundColor Green
— Widgets —
$widgets = “HKLM:\SOFTWARE\Policies\Microsoft\Dsh”
if (!(Test-Path $widgets)) { New-Item -Path $widgets -Force | Out-Null }
Set-ItemProperty -Path $widgets -Name “AllowNewsAndInterests” -Value 0 -Type DWord
Write-Host ” [OK] Widgets” -ForegroundColor Green
Write-Host “n All ads disabled. Please restart your computer.” -ForegroundColor Cyan
Copy → paste → run → restart. That’s it. Every ad, gone.
- Group Policy Reference (Pro/Enterprise/Education)
If you’re running Windows 11 Pro, Enterprise, or Education, you have access to the Group Policy Editor (gpedit.msc), which provides the cleanest way to manage these settings. Here’s a quick reference:
Cloud Content (most impactful)
Path: Computer Configuration → Administrative Templates → Windows Components → Cloud Content
| Policy | Set To | What It Does |
|---|---|---|
| Turn off all Windows spotlight features | Enabled | Master switch for Spotlight, tips, consumer features |
| Turn off Microsoft consumer experiences | Enabled | Stops third-party app suggestions and promoted apps |
| Turn off cloud optimized content | Enabled | Prevents cloud-sourced promotional content |
| Turn off Spotlight collection on Desktop | Enabled | Stops desktop Spotlight ads |
| Do not show Windows tips | Enabled | Disables all tips notifications |
Search
Path: User Configuration → Administrative Templates → Windows Components → Search
| Policy | Set To | What It Does |
|---|---|---|
| Do not allow web search | Enabled | Removes Bing web results |
| Do not search the web or display web results in Search | Enabled | Local-only search |
Widgets
Path: Computer Configuration → Administrative Templates → Windows Components → Widgets
| Policy | Set To | What It Does |
|---|---|---|
| Allow widgets | Disabled | Completely disables the Widgets panel |
Copilot
Path: User Configuration → Administrative Templates → Windows Components → Windows Copilot
| Policy | Set To | What It Does |
|---|---|---|
| Turn off Windows Copilot | Enabled | Fully disables Copilot |
OneDrive
Path: Computer Configuration → Administrative Templates → Windows Components → OneDrive
| Policy | Set To | What It Does |
|---|---|---|
| Prevent the usage of OneDrive for file storage | Enabled | Blocks OneDrive integration entirely |
Microsoft Store
Path: Computer Configuration → Administrative Templates → Windows Components → Store
| Policy | Set To | What It Does |
|---|---|---|
| Turn off Automatic Download and Install of updates | Enabled | Stops silent app installs from Store |
After making changes, run gpupdate /force in an elevated Command Prompt, then restart.
- Third-Party Tools Worth Knowing
If you’d rather not edit the Registry or run PowerShell scripts manually, these free tools can do it with a GUI:
Win11Debloat (Open Source)
A lightweight PowerShell script with an interactive menu. Lets you selectively disable ads, remove bloatware, and tweak privacy settings. Available on GitHub, search for “Raphire Win11Debloat.”
O&O ShutUp10++
A portable GUI tool that manages all Windows privacy and advertising settings with simple toggles. Despite the name, it works perfectly on Windows 11. Create a System Restore point before using.
BloatyNosy
Another open-source Windows 11 debloating tool with a clean interface. Lets you pick exactly what to disable.
⚠️ Tip: Always create a System Restore point before using any third-party debloating tool. Go to System Properties → System Protection → Create.
- What Changed from Windows 10
If you’re coming from our Windows 10 advertising guide, here’s what’s different in Windows 11:
| Feature | Windows 10 | Windows 11 |
|---|---|---|
| Live Tiles | Showed app ads in Start | ❌ Removed entirely |
| Cortana | Showed tips/ads on taskbar | ❌ Deprecated/removed |
| MyPeople | Taskbar icon with promotions | ❌ Removed |
| Copilot | Didn’t exist | ⚠️ New, taskbar icon + prompts |
| Widgets | News & Interests (limited) | ⚠️ Full MSN news feed with ads |
| Start Menu Ads | “Suggested” tiles | ⚠️ “Recommended” section + account notifications |
| Desktop Spotlight | Lock screen only | ⚠️ Now on desktop too |
| Auto-installed apps | Candy Crush, Farmville | ⚠️ TikTok, Disney+, Spotify, Instagram |
| “Finish Setting Up” | Existed but less aggressive | ⚠️ More frequent and persistent |
| File Explorer ads | OneDrive banners | Same, OneDrive + M365 banners |
| Search highlights | Basic web search | ⚠️ Bing Highlights with visual promotions |
Fresh Install? Do This First
If you’re planning a clean install of Windows 11, here’s the optimal order:
- During setup: Choose a local account if possible (or disconnect from the internet before the account creation step, use Shift + F10 then type oobe\bypassnro and hit Enter)
- After first boot: Do NOT click through the “Finish Setting Up” wizard, just close it
- Open Settings and apply all toggles from this guide
- Import the .reg file from Section 18
- Run the PowerShell script from Section 20
- Only then connect to the internet and run Windows Update
This prevents most bloatware from ever being installed in the first place.
Quick Reference Checklist
Here’s every toggle at a glance:
| Area | Settings Path | Key Toggle |
|---|---|---|
| Start Menu ads | Personalization → Start | “Show recommendations…” → OFF |
| Account badges | Personalization → Start | “Show account-related notifications” → OFF |
| Lock screen tips | Personalization → Lock screen | Change from Spotlight; uncheck fun facts |
| Desktop Spotlight | Personalization → Background | Change from Spotlight |
| File Explorer ads | File Explorer → Options → View | “Show sync provider notifications” → OFF |
| Notification tips | System → Notifications → Additional | Uncheck all 3 boxes |
| Finish Setup nag | System → Notifications → Additional | “Suggest ways…” → OFF |
| Widgets | Personalization → Taskbar | “Widgets” → OFF |
| Search highlights | Privacy & security → Search permissions | “Show search highlights” → OFF |
| Copilot | Personalization → Taskbar | “Copilot” → OFF |
| Ad tracking | Privacy & security → General | “Personalized ads…” → OFF |
| Telemetry | Privacy & security → Diagnostics | “Optional data” → OFF; “Tailored experiences” → OFF |
| Settings suggestions | Privacy & security → General | “Show me suggested content…” → OFF |
| Device usage | Personalization → Device usage | All categories → OFF |
⚠️ After major Windows updates, some of these settings may reset. Bookmark this page and recheck after each big update.
Conclusion
Windows 11 is a great operating system buried under layers of advertising. Microsoft has made every Settings toggle and Registry key reversible, so nothing in this guide will break your system. You’re just telling Windows to stop selling you things.
Bookmark this page because Microsoft tends to re-enable some of these settings after major updates, so you may need to revisit it after future Windows 11 updates.
Did we miss anything? Let us know in the comments and we’ll add it to the guide.