There was no official way (until fall creator update) in Windows 10 to turn Laptop’s Wifi into a Wi-Fi hotspot. There is a feature in Windows 7, as called Ad hoc. Microsoft later removed the functionality to create a wifi hotspot but later re-introduced it and named it Mobile Hotspot. Fortunately, regardless of whether your Windows has the feature you can, you can create Wi-Fi hotspot on your laptop or computer.
Windows looks weird on old hardware? Check these os for old pc and install on your computer.
There is some software that can do this work like connectify.me and mhotspot.com or even you can read this tutorial that teaches you doing this on various version of windows. If you also want to share your computer’s internet connection with another device via wifi hotspot, you can use Connectify Pro application, which works fine.
Update: Windows 10 Mobile hotspot
Fix: http://quickfever.com/fix-windows-10-night-light-mode-not-working/
It looks like Microsoft again aids the feature into all the latest Windows 10 builds. They named is Mobile hotspot which is pretty fine IMO. Starting with Windows 10 fall creator update, You can find this feature in the action center to create a hotspot. You can find this option-clicking the action center icon (slide from the right edge of the screen).

It turns your laptop a hotspot and another device can connect to it to share an internet connection. This comes handy when you don’t want to give the password of your source wifi modem or router. One can use this approach to use the computer as a WiFi range extender.

Create Wi-Fi Hotspot on Windows 7/ 8/10
There is a simple step by step procedure that will demonstrate you how to turn your pc/laptop into a wifi hotspot. So you can connect more wifi enabled devices with it.
Understand the terms.
- Command prompt – a built-in tool that is used to give computer commands and accordingly your machine will do their action.
- .bat – it’s a file extension used for commend promote, just like if you open the file, it opens in the command prompt.
Well, now we will be creating simple .bat commands that you can use to start and stop your Wi-Fi Hotspot. You can change the SSID and even secure it using the KEY. So now let’s get started on how to do it.
- WiFi.bat Adds SSID and password.
- WiFiON.bat Turns the hotspot on.
- WiFiOff.bat Switch off the hotspot.
IMPORTANT: Right click and run them as administrator.

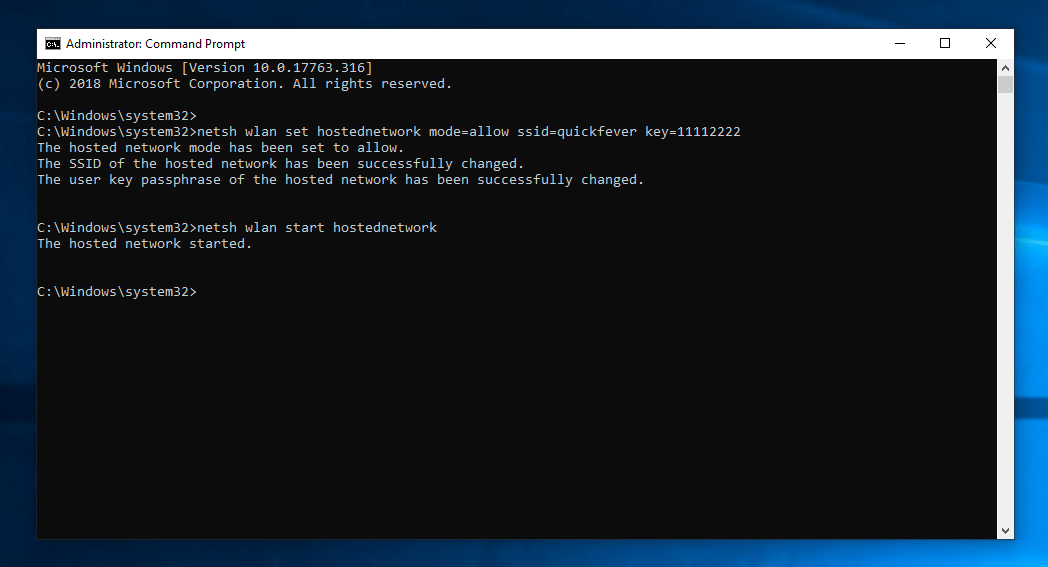
- Step 1. Open Command prompt and paste the following code. Alternatively, open Notepad and type paste below code into it and save this file as WiFi.bat, and it’s done.
netsh WLAN set hostednetwork mode=allow ssid=Quickfever key=12345 netsh wlan start hostednetwork
Tip- 12345 is your password, and Quickfever is SSID, you can name it.
- Step 2. Use the following text to start the hotspot network. Create a Notepad file and paste below code into it. Save it a WiFiON.bat for one click practice.
netsh wlan start hostednetwork

- Step 3. When you want to stop the Hotspot, use the following code. Save it as WiFiOff.bat file for one click practice.
netsh wlan start hostednetwork
Conclusion
You can use the method to create WiFi hotspot to share your computers LAN internet as well as WiFi connection over WiFi. For this to work you only require a WiFi adapter plugged into your computer, inbuilt-wifi will work as well. For an easy approach check the first section and download the Hotspot script which allows you to manage the hotspot on the go, just make sure you run them as an administrative privilege.


