Update: I’ve replaced CWM with TWRP and SuperSU with Magisk. Sadly I no longer have my Redmi 2 device, so support is limited.
In this article, we will demo to you how to root Redmi 2 with TWRP and Magisk. We have documented everything for you to root your Xiaomi Redmi 2 (Global Variant, or any redmi 2)
- Learn how to root redmi 2. with CWM/TWRP and Magisk.
- Learn revert to original MI stock recovery. So you can install OTA updates.
- Learn Unroot redmi 2.
Update: Official Lollipop for Redmi 2/Prime – The odd is even if you install this on a Redmi 2 (not prime) it will work just fine.
Understand the terms
- CWM / TWRP – a Recovery Software this passes extra security layers (in stock recovery) while flashing or update something like ROM or zip and Img files. WE Will show install Cwm with a recovery.Img file.
- SUPERSU – this will manage root permission to apps.
I used these similar terms ‘recovery.img.’ / cwm.img / twrp.img — all are same, recovery.img is the name to demonstrate you. Please understand this word and follow guide replacing it with ‘cwm.img / twrp.img’ according to what recovery you need to use.
How to Root Redmi 2/ prime
We will provide you with ADB and fastboot files. And recovery img (CWM and TWRP) file to install recovery. We divided the process into some segments for ease. Follow them step by step.
UPDATE: You just need to Download the rootkit file. As I included everything inside it. This means you don’t need to download them separately and this will save you time.
Total 2 Download required for rooting Redmi 2/Prime
#1. Download Redmi 2 Root pack (What is included, ADB, Drivers, TWRP, Magisk, SuperSU, Recovery files)
TIP: or right-click to extract the ZIP file, you can also use Use Winrar.
If you are confused between CWM and TWRP, go with TWRP recovery. CWM is just a basic recovery with few options. If you have any issues with download links or similar – contact us through quickfever Facebook page.
Follow these Steps to ROOT REDMI 2
Please follow this procedure step-by-step to get it done successfully.
Step 1. Download The files and extract them on your desktop, this will create a folder, where the files will be extracted.
(a). Inside that folder, you’ll see files (MI, CWM, and TWRP) They are recovery files.
If you downloaded a recovery separately: Look for the recovery zip extract it and copy-paste the (.img) file to ‘main folder’. (don’t be confused if you downloaded CWM, just rename it to cwm.img and paste it inside the folder.) For example, I installed Twrp, So I’ll rename that file as “twrp”.
(b). Place the Supersu zip (download #2) inside your SD CARD/ Internal storage. (you don’t need to extract this file, just place the zip file as it is.)
Now you need to enter in Fastboot mode (it’s required because it enables file transfer directly from PC to phones system to install CWM / twrp.img img recovery)
(c). To Open Fastboot mode you need to turn off your phone and start it by pressing the Power button + Volume Down button at the same time. It will open Fastboot mode. Connect your Phone to your Computer via a USB cable.
Step 2. Now open the ‘main folder‘ (Step #1) and press the Shift +Right mouse button and select open command prompt from here. See video here.
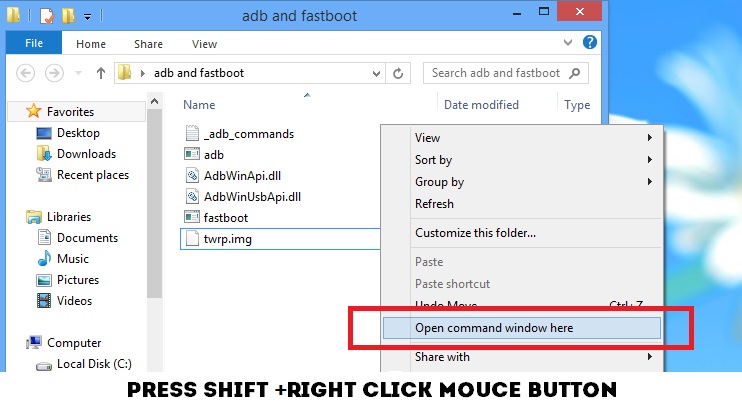
Step 3. You need to type the following commands to determine whether your phone is correctly connected to your PC. The command prompt allows the connection between your Pc and your phone. You need to enter a few commands to root your redmi 2 or prime.
Type – fastboot devices
This command will display the connected devices, Typically you’ll see some numbers if you did everything right. And then proceed to the next command.
But if you didn’t see your devices listed there, your PC might be missing the ADB drivers. I included files inside the folder “AdbDriverInstaller” Install it (Connect your phone to your PC via a USB cable and install the driver).
Now to flash recovery, type the following command. As there are all recovery files are Included, type according to your choice. (If you have another recovery file you downloaded elsewhere, move that file to the folder and rename it to a shorter name for ease and you need to replace the file name in the command)
This command will only install the recovery temporarily.
Type – fastboot flash recovery twrp.img | Permanent install-recovery.
Type – fastboot boot twrp.img | One-time boot into recovery.
Using the above command will instantly load the recovery menu, you don’t need to turn off or restart your phone. Just follow the next steps to install supersu.

But If you want to install the recovery permanently you need to enter this command.
Alternatively, you can use this command: fastboot flash recovery cwm.img, or fastboot flash recovery twrp.img and then type fastboot reboot to boot into recovery mode.
In easy words: It will install the recovery (CWM or TWRP recovery), and that’s what you need. Your recovery will automatically open on your phone, and you can flash or modify the system. Install superSu using the recovery.
Step 5. A recovery menu will display on your phone. Keep in mind this menu is temporary, so you need to install SuperSu right from here. You can also install Magisk module.
Step 5. You will see CWM/ Twrp recovery menu, select Install option, LOCATE the directory where you have the Supersu zip. Why? (Root Redmi 2 by flashing SuperSu 2.xx zip to enable root access.)
And proceed to flash SuperSu zip.That’s it your redmi phone should be rooted. Now you can modify your phone in a manner you want.
Wait! Wait! Here are some goodies.
We have some best apps articles so you can enjoy them with your redmi 2.
Here are best android keyboard apps to supercharge your typing, photo-editing apps to tweak your pics. And a few android apps for bloggers.
Note: (before you apply these commands, make sure you placed Download #2 and extracted the recovery.img (cwm.img or twrp.img) file to the ‘main folder’).
Steps for permanent Recovery Users who used ‘fastboot flash recovery xx.img’ command
TWRP users: Boot your smartphone into TWRP recovery mode by pressing the Power up+down + Volume down button. It’s a bit tricky. You need to press all 3 buttons, press vol up+down first hold it for seconds and then press power up button. (we’are using TWRP for the guide.)
| for TWRP recovery. |
CWM recovery users, You need to press Volume Up+ Power button. (we are using TWRP for the guide, method will be almost same as twrp.)
| Entering CWM menu |
Now follow the step #4 for installing SuperSu zip on redmi 2.
How to restore Stock Mi recovery on Xiaomi Redmi 2.
In case if you wanted to install ‘Mi Recovery‘ again. Because some user faces problems updating the phone. If you are worried about this please root redmi 2 without PC. But if you already rooted using this process and wanted to get Stock Recovery back.
Just follow the steps above and type this command: fastboot boot mi.img it will install the original MI recovery 2.0.1 on your Redmi 2 phone.
Download MI recovery file seperatly – download redmi 2 Stock Recovery (2.0.1)
And extract and flash recovery.Img file and practice the same process. Or utilize the fleshify app.
Now Get a drink and relax, your Redmi 2 is rooted.
How to UNROOT redmi 2
We think that you have SuperSu installed on your redmi 2. Open SuperSu app on your Android and go to Settings click – Full Unroot. Then restart your android redmi 2.
Thanks for following this article, If this helped you, please support us, Share it. Subscribe our newsletter.
Final Words.
That’s all for now; we’ll update this post eventually. You can like our facebook page, and we’ll notify you up-to-date stuff. If you feel something wrong with this guide, let us know in the comment section.




thankyou brother it is very simple to follow your instruction.
thankyou so much
Thanks. It was hassle-free and I could do it easily!!
thanks for your help.but if am rooting the device suddenly if it bricks , can i bring it back to my stock rom i.e MIUI 8 and is there any need of the backup?
Hello Jooseph, If you have the same version or newer fastboot version ROM, flash it using MIFlash tool while selecting “Save User data” option. SO that it won’t delete anything and it’ll be like you’ll continue where you left.
thank you for guide about root redmi 2
super helped me to root my device quickly and safely
Glad, it could help.
The device version I have is 2014818.As there are many versions,will files for wt88047 be supported?
Hey buddy. Thanks. The instructions were simple and easy. So thanks.